Grassland Dairy Salted Whipped Butter
Make Grassland Dairy Salted Whipped Butter in just 10 minutes! This quick and easy recipe features fresh heavy cream and sea salt for a delightful spread. Perfect for breakfast or brunch. Enjoy with bread or pancakes.

- about grassland dairy salted whipped butter
- secrets behind perfect grassland dairy salted whipped butter
- your new favorite grassland dairy salted whipped butter
- health & nutrition highlights of grassland dairy salted whipped butter
- recipe at a glance : grassland dairy salted whipped butter
- quality ingredients breakdown
- kitchen equipment essentials
- pro ingredient tips
- expert cooking method for grassland dairy salted whipped butter
- game - changing tips
- perfect presentation
- storage & make - ahead
- creative variations
- expert faq solutions
- complete nutrition guide
- Recipe Card
about grassland dairy salted whipped butter
grassland dairy salted whipped butter isn't just any butter; it carries a rich history rooted in the traditions of dairy farming, this delightful spread has been enjoyed for centuries, originating from the time when families churned their own butter at home, today, with modern conveniences, we...
secrets behind perfect grassland dairy salted whipped butter
the culinary heritage supporting salted whipped butter is fascinating and deeply intertwined with various cultures around the world, historically, regions that excelled in dairy production have their variations of whipped butter, each bringing something special to the table, the origin story is equally compelling; early settlers would often use heavy cream left over from milk to create a buttery delight that could be stored for longer periods .
in addition to its historical significance, salted whipped butter plays an essential role in many cuisines today from breakfast pancakes to gourmet dishes served at upscale restaurants, its modern - day popularity is undeniable as more people are returning to homemade staples and seeking out wholesome ingredients .
your new favorite grassland dairy salted whipped butter
what makes grassland dairy salted whipped butter stand out are its unique flavor combinations, whether you choose traditional salt or experiment with fresh herbs like chives or rosemary, there's no limit to what you can create. plus, mastering this foolproof technique takes minimal effort thanks to expert - tested methods that guarantee success every time .
don't worry if you're short on time; i've got some time - saving tips up my sleeve. with just a few minutes and simple equipment a mixer and mixing bowl you’ll be on your way to enjoying freshly whipped goodness without breaking a sweat .
health & nutrition highlights of grassland dairy salted whipped butter
when it comes to health benefits, let's talk about those key nutritional highlights. heavy cream contains essential vitamins such as a and d while providing healthy fats necessary for energy levels throughout the day, of course, moderation is key since it's still calorie - dense but indulging every now and then can fit beautifully into balanced nutrition .
for those with dietary considerations like lactose intolerance or vegan preferences ? no worries there are alternatives like coconut cream available too. ultimately, this versatile recipe allows everyone an opportunity for enjoyment while boosting wellness through healthy fat sources .
recipe at a glance : grassland dairy salted whipped butter
now let’s break down what you'll need for making your very own batch of heavenly spread :
- total preparation time : just 10 minutes (plus optional chill time.)
- skill level required : super easy perfect even for kitchen novices.
- serving size details : makes approximately 1 cup of delicious whipped butter .
- cost efficiency : extremely budget - friendly considering how much richer homemade options taste compared store - bought varieties.
so there you have it the ultimate guide packed full of everything you need before diving into whipping up your first batch of grassland dairy salted whipped butter. you'll soon find yourself hooked on creating flavorful spreads tailored perfectly just for you (and trust me . ., your family will thank you.) .
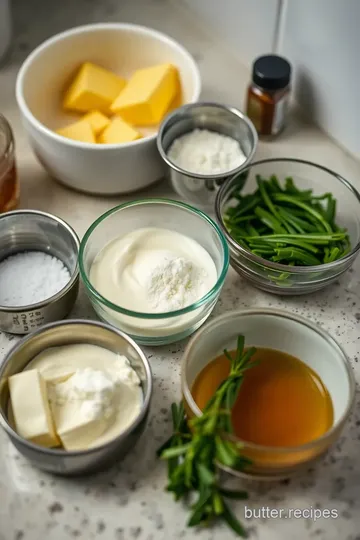
quality ingredients breakdown
when it comes to making the perfect grassland dairy salted whipped butter, using quality ingredients is essential, not only do they enhance flavor, but they also elevate the overall experience of your dish, let’s break down what you need and how to choose the best options .
premium core ingredients
-
fresh heavy cream : 2 cups (1 pint)
choosing fresh heavy cream is crucial for that rich, velvety texture, look for cream that has a high fat content at least 36%, you’ll want it to be cold when whipping; check the expiration date and look for any signs of separation or off smells before purchasing, store it in the fridge until you're ready to use it. -
fine sea salt : 1 teaspoon
opt for fine sea salt as it blends seamlessly into your whipped butter, enhancing its flavor without being overpowering, the best way to ensure quality is by sourcing from reputable brands known for their purity, keep your salt stored in a cool, dry place away from moisture . -
honey or maple syrup (optional) : 1 tablespoon
if you decide to sweeten your butter a bit, go with pure honey or real maple syrup no artificial sweeteners here. choose organic if possible for that authentic taste, store them in airtight containers at room temperature or in the fridge once opened .
signature seasoning blend
adding signature flavors can take your whipped butter from basic to incredible. here are some great ways to spice things up :
-
spice combinations
a dash of smoked paprika or cayenne pepper can give your butter a nice kick. when selecting spices, always choose whole spices when possible and grind them fresh; this enhances aroma and flavor significantly . -
herb selections
fresh herbs like chives, rosemary, or thyme add freshness and brightness, always opt for vibrant green herbs without wilting leaves the fresher they are, the better they'll taste. keep them wrapped in damp paper towels inside an airtight bag in the fridge . -
flavor enhancers
consider adding garlic powder or onion powder if you're after some savory notes they pack a punch. just remember that less is more; start with small amounts so you don’t overwhelm those delicate flavors . -
aromatic additions
a hint of citrus zest (like lemon) can brighten up your whipped butter beautifully, make sure you wash fruits thoroughly before zesting since pesticides often linger on skins .
smart substitutions
sometimes life throws curveballs at us; here’s how you can adapt :
-
alternative options
if heavy cream isn’t available try half - and - half it won’t whip quite as well but still works okay if you're desperate. -
dietary swaps
for dairy - free versions of whipped "butter," coconut cream is an excellent alternative; just make sure it's well - chilled beforehand. -
emergency replacements in case you've run out of sea salt ? regular table salt works too but use about half since it's finer than sea salt.
-
seasonal variations
in summer months ? try incorporating basil instead of rosemary for an herbaceous twist that's perfect on grilled veggies.
kitchen equipment essentials
to whip up this delightful salted goodness smoothly and efficiently, you'll need some key kitchen tools :
must - have tools
1, stand mixer with whisk attachment : while hand mixers work too i’m personally lazy sometimes and love letting my stand mixer do all the hard work . 1, mixing bowl : go big enough so there’s room for splatter. 1, rubber spatula : perfectly folds everything together without wasting any precious mixture . 1, airtight container : to keep that deliciousness fresh longer trust me on this one.
recommended appliances
if you're really enthusiastic about cooking gadgets (no judgment here), consider investing in :
• food processor – it helps mix things quickly if you're doubling recipes. • electric whisk – they’re super handy if you don't have space for larger appliances yet still want fluffy results .
helpful gadgets
ever thought about getting a good set of measuring spoons ? seriously helpful when keeping proportions right while mixing flavors together.
home alternatives
don’t have all these fancy tools ? no worries at all you can whip by hand with a whisk too. just prepare yourself because it'll take some elbow grease . . .and maybe get ya sweating just slightly .
pro ingredient tips
want insider secrets on choosing top - quality ingredients ? here we go :
selection secrets
always pick local whenever possible local farms often provide fresher products than store - bought items sitting around forever . . .
quality markers
for creams specifically look at consistency; thicker creams usually mean higher fat content which equals better whipping power.
storage solutions
keep everything stored tightly sealed after opening isn’t nobody got time wasting good stuff ?
money - saving tips
buy larger quantities when available they tend towards smaller prices per unit and freeze what you won't use immediately (like extra herbs), they'll retain their essence surprisingly well this way.
so now you've got all these tips under your belt alongside solid ingredient guidance ready before diving into creating buttery perfection. happy cooking.
expert cooking method for grassland dairy salted whipped butter
essential preparation steps
1, mise en place : begin by gathering all your ingredients and equipment, you’ll need 2 cups of fresh heavy cream, 1 teaspoon of fine sea salt, a tablespoon of honey or maple syrup (if you like it sweet), and some fresh herbs or spices for optional flavoring, grab your stand mixer with a whisk attachment, a mixing bowl, a rubber spatula, and an airtight container .
1, prep techniques : chill the mixing bowl and whisk in the refrigerator for about 15 - 20 minutes before you start, this little step is key. a cold bowl helps the cream whip up faster trust me; i learned this after my first attempt turned into a soupy mess.
1, time management : the whole process takes about 10 minutes from start to finish (excluding chill time), so while that’s not too long, it’s best to have everything ready beforehand to keep things moving smoothly .
1, organization tips : keep your workspace tidy. having everything within arm's reach makes whipping butter way less stressful than searching through clutter mid - process .
professional cooking method
1, step - by - step process :
- once chilled, pour the heavy cream into your mixing bowl .
- start whipping on low speed to avoid splashes no one wants dairy flying everywhere.
- gradually increase to medium - high speed until soft peaks form (about 3 - 5 minutes) .
1, temperature control : make sure your heavy cream is very cold before starting; warm cream will not whip well at all, if you're using any optional flavorings like herbs or spices, they can be added later in the process .
1, timing precision : after reaching soft peaks, sprinkle in the salt and add honey/maple syrup if desired while still whipping it should take another 2 - 3 minutes until stiff peaks form .
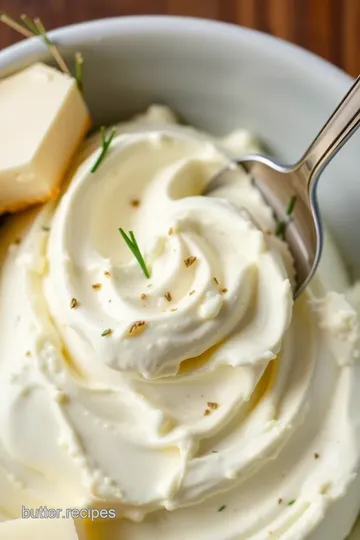
1, success indicators : stiff peaks mean it's ready. you want those lovely glossy swirls standing tall without collapsing back down when you lift out the whisk .
expert techniques
1, professional methods :
- when adding flavors like chopped chives or smoked paprika (my personal fave.), fold them gently with a rubber spatula once you've achieved stiff peaks .
1, critical steps :
- avoid over - whipping. if you see separation between liquid buttermilk and solids forming stop right there; otherwise you'll end up with actual butter instead of whipped butter.
1, precision points :
- pay attention to texture throughout; it should be airy yet spreadable not grainy or too runny.
1, quality checks :
- taste - test as you go along. sometimes i find myself needing just a pinch more salt or sweetness depending on what i'm pairing my whipped butter with later on .
success strategies
1, troubleshooting tips :
- if it doesn’t seem thickening enough after several minutes of whipping just give it more time but keep an eye on it; no one wants butter soup.
1, quality assurance :
- always taste as you mix you might discover that perfect balance between salty and sweet that makes all the difference.
1, perfect results guide :
- aim for that perfect fluffy texture where it's easy to spread straight from the fridge a good sign you're doing well.
1, final touches – store your whipped butter in an airtight container either at room temperature if you'll use it quickly or refrigerate if saving for later it firms up nicely in there without losing its deliciousness.
and voilà. with these expert techniques under your belt, you’ll create some irresistible grassland dairy salted whipped butter that's sure to impress anyone lucky enough to try it out. happy cooking.

game - changing tips
when it comes to whipping up that perfect salted whipped butter, a few insider tips can really elevate your game, first off, use the freshest heavy cream you can find trust me, it makes a world of difference. i remember once using some older cream and, well . ., let’s just say the flavor wasn’t what i expected (yikes.) .
another pro tip is to whip at medium - high speed once you start; this helps achieve those light and airy peaks without too much effort, if you’re feeling adventurous, try adding in your salt gradually while whipping this ensures an even distribution of flavor throughout .
also, don’t skimp on the chill time for your bowl and whisk, it may seem like a small step but believe me when i say it’s key. and lastly, keep an eye on the consistency; over - whipping can turn it into butter and nobody wants that if they’re after fluffy whipped goodness.
perfect presentation
so you’ve got this gorgeous bowl of salted whipped butter ready to go ? let’s talk about how to make it look as good as it tastes, plating is everything. try serving your butter in a rustic wooden dish or a pretty glass jar it adds character.
garnishing with fresh herbs like chives or rosemary not only looks stunning but smells heavenly too, just sprinkle them right before serving for that extra pop, if you're going for sweetened versions, consider drizzling honey artfully over the top or adding some crushed berries for color .
and don't forget about serving suggestions. pairing your whipped butter with warm bread rolls or corn on the cob instantly ups its visual appeal everyone loves those golden hues against rich yellow butter.
storage & make - ahead
if you're like me and love having things prepped ahead of time (because who doesn’t ?), here’s how to store your delicious creation properly, transfer any leftovers into an airtight container; trust me on this one it'll keep your flavors intact .
for longer preservation, consider freezing portions wrapped tightly in plastic wrap followed by foil wrap, just thaw overnight in the fridge when you're ready to use again you’ll be amazed at how fresh it still tastes.
and freshness tips ? always check for any change in smell or texture before using previously stored batches better safe than sorry.
creative variations
now let’s get creative. the beauty of salted whipped butter is its versatility; you can play around with so many flavors. want something zesty ? add lemon zest and thyme for a refreshing twist .
if dietary modifications are needed, swap out regular heavy cream with coconut cream for dairy - free options the result will amaze you. seasonal twists work wonders too : think pumpkin spice during fall or fresh garlic mixed in during summer bbqs .
regional variations can also bring fun flair try mixing in smoked paprika if you're channeling southern vibes or even chipotle powder for something more southwestern, the possibilities are endless.
expert faq solutions
got questions ? you’re not alone. here are some common concerns people have when making their own salted whipped butter :
-
what do i do if my mixture separates ? no worries just gently fold everything back together instead of panicking .
-
why isn’t my cream whipping up nicely ? ensure it's cold enough or maybe try switching mixers if yours isn't powerful enough .
-
can i add other ingredients later ? absolutely but incorporate them carefully so they blend well without deflating all that precious air you've worked hard to whip in .
remember : practice makes perfect. each batch gets easier as you go along .
complete nutrition guide
last but definitely not least a quick nutrition breakdown because we all care about what goes into our food. one tablespoon packs around 100 calories primarily from fat with most being good fats from heavy cream .
health benefits include providing energy plus essential vitamins a and d found naturally occurring in dairy products which support bone health among others, for portion guidance : stick to one tablespoon per serving unless you're treating yourself (which hey we're allowed sometimes.) .
so there you have it a comprehensive guide packed full of ideas and insights that'll help make your grassland dairy salted whipped butter extraordinary every single time.
Grassland Dairy Salted Whipped Butter Card

⚖️ Ingredients:
- 2 cups (1 pint) of fresh heavy cream
- 1 teaspoon fine sea salt (adjust to taste)
- 1 tablespoon honey or maple syrup (optional, for sweetness)
- Fresh herbs or spices (such as chives, rosemary, or smoked paprika) for flavoring (optional)
🥄 Instructions:
- Step 1: Gather Your Equipment: Stand mixer with a whisk attachment or a hand mixer, mixing bowl, rubber spatula, airtight container for storage.
- Step 2: Chill the Bowl and Whisk: For best results, place your mixing bowl and whisk in the refrigerator for about 15-20 minutes before starting. This helps the cream whip faster.
- Step 3: Pour in the Cream: Once chilled, pour the heavy cream into the mixing bowl.
- Step 4: Start Whipping: Start your mixer on low speed to avoid splattering. Gradually increase to medium-high speed. Continue whipping until soft peaks form; this should take about 3-5 minutes.
- Step 5: Add Salt and Sweetener: While continuing to whip, sprinkle in the fine sea salt and add honey/maple syrup if using.
- Step 6: Whip Until Stiff Peaks Form: Keep whipping until stiff peaks form—this will take an additional 2-3 minutes after adding salt/sweetener.
- Step 7: Optional Flavor Additions: If you want flavored butter, fold in finely chopped fresh herbs or spices at this stage using a rubber spatula until evenly distributed.
- Step 8: Storage and Chill Time: Transfer your whipped butter to an airtight container. You can use it immediately or refrigerate it to firm up slightly for better spreading consistency if desired.
- Step 9: Serve & Enjoy! – Use your salted whipped butter on bread, pancakes, vegetables, meats – wherever you love buttery goodness!
Previous Recipe: Quick Peanut Butter Cereal Delightful Breakfast
Next Recipe: Boil Peanut Butter Taffy - Sweet & Chewy Treat