Hotty Butter Slime
Make Hotty Butter Slime in just 10 minutes! This easy no-cook recipe uses school glue, water, and baking soda. Perfect for kids' crafts or sensory play.

- about introduction
- the ultimate guide to hotty butter slime
- the magic behind this recipe
- health & nutrition highlights
- recipe at a glance
- essential components guide
- kitchen equipment essentials
- pro ingredient tips
- professional cooking guide
- master chef's advice
- perfect presentation
- storage & make - ahead
- creative variations
- expert faq solutions
- complete nutrition guide
- Recipe Card
about introduction
welcome to the world of hotty butter slime , a delightful and squishy sensory experience. this fun, playful creation has roots that branch out into various cultures, where similar slime - like substances have been enjoyed for generations, from traditional craft activities to modern diy projects, making slime has evolved into a beloved pastime for both kids and adults alike, the historical background reveals that crafting with glue and water dates back decades who knew something so simple could spark such joy ?
what makes hotty butter slime stand out is its unique texture and versatility, not only is it incredibly easy to make, but it also provides an engaging way for children (and let’s be honest, even adults.) to explore creativity while honing fine motor skills, plus, you can customize your slime with colors, scents, or glitter. it's like having a mini art project right at your fingertips .
the ultimate guide to hotty butter slime
when we dive into the rich culinary heritage of slime - making (yes, i said culinary because this gooey goodness is just as exciting.), we discover fascinating stories behind its origin, many cultures have their versions of tactile play experiences like traditional japanese "slime" made from rice flour or other natural ingredients which showcase the universal appeal of this activity .
today’s hotty butter slime stands as a testament to our modern - day creativity, its cultural significance lies in how it brings families together; creating it fosters bonding time filled with laughter and exploration, as more people share their creations on social media platforms like instagram or tiktok, it's no wonder why this trend continues to gain popularity among all age groups.
the magic behind this recipe
so what’s the magic behind hotty butter slime ? well first off it’s all about those unique flavor combinations… oh wait, not flavors sorry my mind wandered there. what i meant was textures. the combination of white school glue and lotion creates an irresistibly soft consistency that feels fantastic when stretched or squeezed .
now let's talk about foolproof techniques : whether you're a seasoned pro or trying this for the first time, i promise you won't mess it up. the expert - tested method ensures perfect results every single time if you follow along step - by - step (trust me on this one.), and here’s a little insider tip i’ve found that mixing in contact lens solution gradually really helps achieve that perfect slimeiness without going overboard.
time - saving tips ? absolutely. prep everything ahead the measuring cups washed beforehand make cleanup easier and consider doubling the batch so you have enough for everyone.
health & nutrition highlights
while hotty butter slime isn’t exactly health food (definitely don’t eat it.), understanding key nutritional considerations adds another layer of awareness when engaging with sensory play materials, for instance :
- most ingredients are safe for skin contact .
- using unscented lotion might be beneficial if irritations occur .
wellness advantages include using mindfulness during crafting sessions; focusing on these creative tasks allows us moments away from screens a much - needed breather nowadays .
balanced nutrition facts may not apply directly here since we're talking about non - edible crafts but knowing what goes into our recipes ensures safety during playtime.
recipe at a glance
let me break down hotty butter slime quickly so you know exactly what you're getting into :
- total preparation time : just 10 minutes.
- skill level required : easy - peasy; anyone can do this.
- serving size details : one batch yields roughly two cups of delightful goo .
- cost efficiency : super budget - friendly considering most items are already around your home or can be easily found at local stores .
there you go a brief glimpse into the wonderful world surrounding hotty butter slime. now grab those supplies and get ready to unleash some serious fun while creating memories that'll last longer than any sticky situation ever could. 🥳
essential components guide
when it comes to making your own hotty butter slime, the right ingredients are key to achieving that perfect stretchy and soft texture, let’s dive into the essential components you’ll need.
premium core ingredients
-
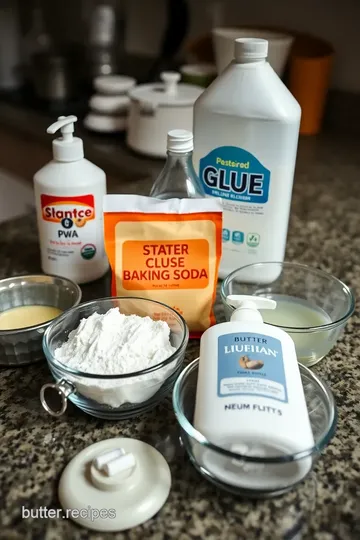
white school glue (pva glue) - 1 cup
look for a brand that is non - toxic and specifically labeled as pva glue, this type of glue creates a great base for your slime because it’s flexible and holds up well over time, i’ve tried cheaper brands before, but they often lead to a sticky mess trust me. store any leftover glue in a cool, dry place . -
water - 1/2 cup
use clean tap water at room temperature, it helps blend everything together smoothly without clumps, if you have hard water, consider using filtered or distilled water instead; this can make a noticeable difference in your final product . -
baking soda - 1 tbsp
this ingredient is crucial for giving your slime its structure, it helps thicken the mixture and makes it less sticky once activated with contact solution, keep baking soda sealed in an airtight container to maintain its potency . -
contact lens solution - 1/4 cup
make sure it contains boric acid and sodium borate; these are what activate the slime. not all solutions work, so check the ingredients carefully, store this away from direct sunlight to keep it effective . -
lotion - 2 tbsp
choose unscented or lightly scented lotion for adding softness to your slime while keeping it stretchy, i learned the hard way not all lotions mix well some can make things greasy instead of fluffy. keep lotion stored in a cool spot where it won’t get too hot or cold .
signature seasoning blend
while we’re not cooking here, think of this section like adding “seasoning” or special touches to enhance our hotty butter slime experience.
-
food coloring/pigment powder (optional)
grab some food coloring if you want vibrant colors. gel - based colors give richer hues than liquid ones; just add drops until you hit that dreamy shade. for storage, keep any unused colorings away from light they fade faster than you'd believe. -
glitter or confetti (optional)
want sparkle ? throw in some glitter during kneading for extra pizzazz. use eco - friendly glitter if you're feeling green about plastic waste it’s becoming more accessible these days .
smart substitutions
sometimes life throws curveballs don’t worry; there are alternatives available.
-
alternative options :
if white school glue isn’t available, clear school glue works beautifully too. just be aware that transparency might change how vibrant those colors look when mixed in . -
dietary swaps :
looking for gluten - free options ? your basic ingredients already fit this bill since none contain gluten but always check labels just to be sure. -
emergency replacements : out of contact lens solution ? try mixing equal parts baking soda with warm water as an activation substitute but results may vary slightly compared to standard solutions.
-
seasonal variations :
for fall - themed slimes, consider using pumpkin spice scents mixed into lotion your kiddos will adore squishing around autumn vibes while they play.
kitchen equipment essentials
now let’s chat about those must - have tools you don’t want anything getting messy unnecessarily when crafting slimes at home.
must - have tools
1, mixing bowl : a large one works best since you'll be combining several ingredients . 1, measuring cups : accurate measurements ensure success every time . 1, spoon or whisk : for mixing up everything nicely before kneading begins. 1, airtight container : to store leftover slime safely between play sessions .
recommended appliances
you don’t need fancy gadgets here just some basics :
- hand mixer (if preferred) : makes blending quicker but isn’t necessary .
- food scale (for precise measures) : handy if you're making larger batches.
helpful gadgets
if you’re feeling adventurous :
- silicone spatula : perfect for scraping down sides of bowls without wasting materials.
- craft mat : protects surfaces while providing easy cleanup post - slime session it gets messy sometimes that's half the fun though.
home alternatives
no measuring cups ? no problem. use regular drinking glasses a quarter glass equals about one cup and you'll still whip up delightful hotty butter slime without stress .
pro ingredient tips
these little nuggets of wisdom come straight from my trial - and - error experiences… trust me on these gems :
1, selection secrets : always read labels closely; brands can vary significantly regarding quality . 1, quality markers : check expiration dates on all products including glues even craft supplies do expire eventually. 1, storage solutions : consider repurposing old jars for storing excess supplies neatly no unnecessary clutter here . 1, money - saving tips : buy bulk sizes when possible; they last longer and save cash down - the - line.
and there you have it the essential guide full of tips and tricks that'll help you nail that perfect batch of hotty butter slime every single time. so roll up those sleeves it’s time for some gooey fun.
professional cooking guide
essential preparation steps
before diving into cooking, it's crucial to organize everything, start with mise en place , which means having all your ingredients prepped and ready to go, this includes chopping vegetables, measuring spices, and gathering tools like pots, pans, and utensils .
next up is prep techniques. for instance, if you're working with garlic, mincing it finely can enhance its flavor in the dish, take time to properly wash fruits and veggies too; a little dirt never adds anything good to your meal .
time management is key here, if a recipe says it’ll take 30 minutes total but includes steps that overlap (like simmering sauce while boiling pasta), plan accordingly. don’t forget about multitasking when you can it's not just efficient; it makes the process flow smoother .
finally, keep your workspace organized, a clutter - free kitchen helps avoid accidents or last - minute scrambles for forgotten ingredients, plus, when everything’s tidy around you, it’s easier to focus on cooking.
professional cooking method
now let’s get into the nitty - gritty of professional cooking methods, after prepping comes the actual step - by - step cooking process, follow your recipe closely at first until you feel confident enough to start improvising .
temperature control plays a huge role in achieving perfect dishes know whether you need high heat for searing or low heat for slow - cooking meats, as a general rule : hot pan equals quick results.
timing precision matters too invest in a good timer or use your phone's stopwatch feature so that nothing overcooks or burns while you're distracted by other tasks .
as for success indicators ? look out for visual cues. for example, meat should reach an internal temperature of 165°f (75°c) when fully cooked through; veggies should be bright and crisp rather than dull and mushy .
expert techniques
when it comes down to expert techniques in professional cooking, don’t skip critical steps like letting proteins rest after searing them it locks in juices. also consider the importance of tasting as you cook; adjusting seasoning at each stage can make all the difference between okay food and fantastic food .
precision points are essential during plating too : think about colors and textures on each plate so they’re visually appealing as well as delicious. the final check ? make sure every element complements one another without overpowering flavors clashing against each other .
quality checks are vital not just before serving but also throughout cooking. check sauces regularly for thickness or taste adjustments needed before moving forward with additional components added later on.
success strategies
even pros need troubleshooting tips sometimes. if something isn’t going right a sauce might curdle if heated too quickly don’t panic. adding cream slowly while whisking often saves ruined sauces from disaster .
for quality assurance during cooking ? keep clean utensils handy so there’s no cross - contamination if switching between raw foods like chicken then handling fresh salad items afterward.
want perfect results every time ? rely on tried - and - true methods such as blanching vegetables briefly before sautéing them they retain vibrant colors this way instead of turning drab.
lastly the final touches matter immensely; garnish dishes thoughtfully with herbs or drizzle some olive oil over plated meals right before serving it brings life back into what could seem flat otherwise.
remember these guidelines next time you're whipping up something special you'll impress both yourself and anyone lucky enough to share that meal with ya.
master chef's advice
when it comes to crafting the perfect hotty butter slime, even seasoned pros have their tips. one key insight is to use room temperature ingredients; trust me, it makes everything blend more smoothly, also, don’t rush the contact lens solution – add it slowly while stirring, it's like magic watching that gooey mixture transform right before your eyes. finally, keep experimenting until you find what works best for you; every batch is a learning experience, the success guarantees ? a little patience and a sprinkle of creativity go a long way.
perfect presentation
okay, so we all know slime isn’t exactly dinner party material, but that doesn’t mean we can’t make our hotty butter slime look fabulous. for instance, if you've added glitter or confetti (which you totally should), consider displaying it in clear jars or bowls, this showcases...
storage & make - ahead
you want your slime to last longer than just one play session, right ? when storing hotty butter slime, make sure to pop it into an airtight container after each use, this helps maintain its squishiness and keeps it from drying out like old bread yikes....
creative variations
let’s get creative here. want to jazz up your hotty butter slime ? think about flavor adaptations by using scented lotions instead of unscented ones like vanilla or lavender it adds an extra sensory dimension that's hard to resist. dietary modifications aren’t really applicable here since...
expert faq solutions
you’ve got questions; i’ve got answers. one common concern is how to fix sticky slime that won’t come together properly no worries there, just add more contact lens solution gradually until things start coming together nicely again, another frequent issue involves color mixing if you’re trying layered colors and they bleed into one another… oops. try letting each layer set slightly before adding another on top next time around, remember : practice makes perfect when creating this playful concoction.
complete nutrition guide
now let’s be real : while hotty butter slime might not win any health awards (it’s not edible.), there are still some points worth noting regarding safety during playtime sessions with kids (and adults too.), always supervise younger children while playing with slime as they might get curious about tasting their creations uh - oh. as for portion guidance ? a small handful goes a long way since most people tend to enjoy molding rather than consuming quantities large enough for snacks anyway .
so there you have it a complete guide filled with master chef advice and much more surrounding the fun world of hotty butter slime creation. enjoy every squishy moment along the way.
Hotty Butter Slime Card
⚖️ Ingredients:
- 1 cup white school glue (PVA glue)
- 1/2 cup water
- 1 tbsp baking soda
- 1/4 cup contact lens solution (must contain boric acid and sodium borate)
- 2 tbsp lotion (preferably unscented or lightly scented for a softer texture)
- Food coloring or pigment powder (optional, for color)
- Glitter or confetti (optional, for decoration)
🥄 Instructions:
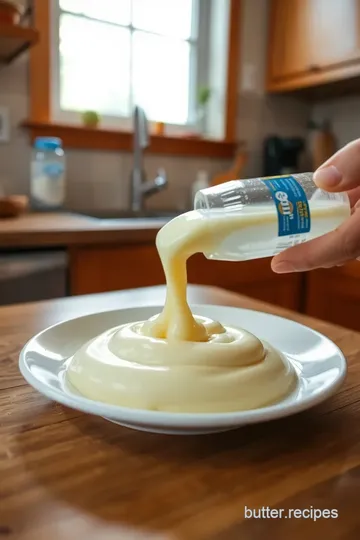
- Step 1: - In a large mixing bowl, combine the white school glue and 1/2 cup of water. Stir well until fully mixed.
- Step 2: - If you want to add color to your slime, now is the time! Add a few drops of food coloring or pigment powder into the glue mixture and stir until you reach your desired shade.
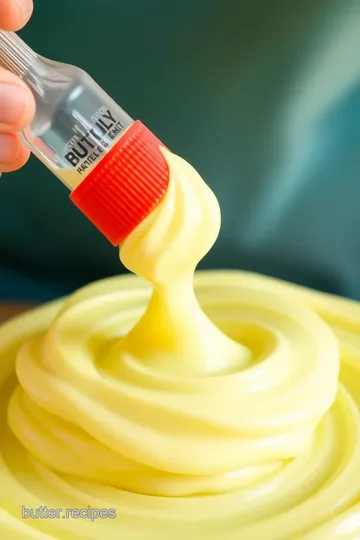
- Step 3: - Sprinkle in the baking soda and mix thoroughly. This step helps to firm up the slime.
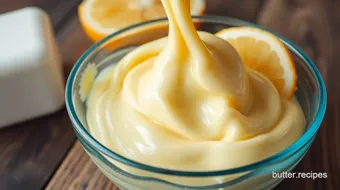
- Step 4: - Add 2 tablespoons of lotion to make your slime stretchy and soft. Mix it well until completely incorporated.
- Step 5: - Slowly add in the contact lens solution one tablespoon at a time while stirring continuously. You will notice that the mixture starts to thicken and pull away from the sides of the bowl as it becomes more cohesive.
- Step 6: - Once it forms a ball-like consistency and is less sticky
- Step 7: - If youd like sparkly slime, fold in glitter or confetti during this kneading phase.
- Step 8: - Place your finished Hotty Butter Slime into an airtight container when not in use to keep it fresh!
Previous Recipe: Bake Coconut Butter Crackers in 35 Minutes
Next Recipe: Easy Lemon Butter Face Mask Delight