PBfit Peanut Butter Cups with a Twist
Enjoy these PBfit Peanut Butter Cups—quick and easy to make in just 25 minutes! Made with dark chocolate and creamy peanut butter for a delicious sweet treat. Perfect for any occasion!

- about pbfit peanut butter cups with a twist
- master the art of pbfit peanut butter cups
- why you'll love this version
- health & nutrition highlights
- recipe at a glance
- essential components guide
- kitchen equipment essentials
- pro ingredient tips
- foolproof cooking steps
- success guaranteed tips
- perfect presentation
- storage & make - ahead
- creative variations
- expert faq solutions
- complete nutrition guide
- Recipe Card
about pbfit peanut butter cups with a twist
peanut butter cups have a delightful history that many of us cherish, originally popularized in the 1920s by harry burnett reese, these sweet treats quickly became an american favorite, the combination of chocolate and peanut butter creates an indulgent experience one that’s hard to resist. fast forward to today, and we’ve found ways to elevate this classic dessert even further, enter pbfit peanut butter cups with a twist, which adds a healthier spin using pbfit powdered peanut butter .
unlike traditional recipes packed with sugar and calories, our version offers unique benefits, the use of pbfit not only cuts down on unhealthy fats but also infuses your treat with extra protein perfect for those who want to indulge without the guilt. plus, they are easy to make at home, allowing you to control the ingredients while satisfying your sweet tooth .
master the art of pbfit peanut butter cups
the culinary heritage surrounding peanut butter cups is rich and fascinating, they represent not just a delicious treat but also a convergence of cultures the creamy comfort from american kitchens mixed with decadent european chocolate traditions, from their humble beginnings as candy bars in stores to modern homemade varieties like ours, these delights have become universal symbols of indulgence .
the origin story behind these cups is intriguing too; they were initially created from leftover chocolate from other confections, this resourcefulness speaks volumes about how culinary experimentation can lead to beloved classics. today’s popularity continues unabated thanks to social media showcasing creative spins on this nostalgic treat .
why you'll love this version
what makes this version so special ? well, it’s all about flavor combinations that tantalize your taste buds while remaining healthier than typical options. the fusion of dark (or milk) chocolate paired with the nutty notes from pbfit provides both richness and depth you won’t find anywhere else .
we’ve perfected foolproof techniques throughout our testing process; if i can do it without burning my kitchen down, trust me you can too. with expert - tested methods included in our recipe, you'll feel like a pro every step along the way, plus, we share time - saving tips because who doesn’t love spending less time preparing treats ?
health & nutrition highlights
let’s talk nutrition for just a moment because who says dessert can't be nutritious ? one key benefit of using pbfit powdered peanut butter is its lower fat content compared to regular peanut butter while still offering loads of flavor, each cup packs around 120 calories making them perfect for an occasional snack or even post - workout fuel.
dietary considerations matter too; whether you're keeping an eye on sugars or following specific diets such as gluten - free or vegetarian lifestyles this recipe fits right in seamlessly. and let’s face it : balanced nutrition isn’t just about counting macros it’s enjoying what you eat without sacrificing health.
recipe at a glance
here’s everything you need regarding preparation details :
- total preparation time : just 15 minutes.
- skill level required : easy enough for anyone.
- serving size details : makes 12 delicious cups .
- cost efficiency : with affordable ingredients like chocolate chips and coconut oil available at most grocery stores, it's budget - friendly.
in summary ? these scrumptious pbfit peanut butter cups with a twist deliver rich flavors alongside numerous health perks all wrapped up into one mouthwatering bite - sized delight.
essential components guide
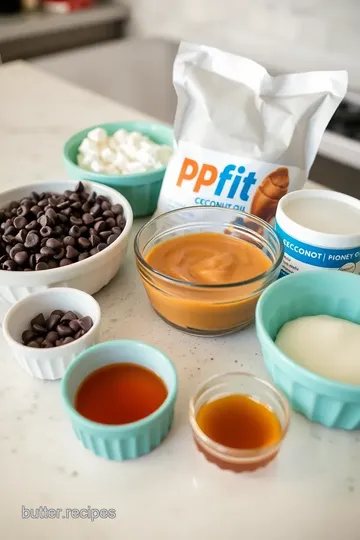
when it comes to making the perfect pbfit peanut butter cups with a twist, having the right ingredients is key. let’s break down what you’ll need for this delicious treat .
premium core ingredients
-
1 cup dark chocolate chips
quality indicators : look for high - cocoa content (70% or more) for a rich flavor, brands like ghirardelli or guittard are often top choices .
selection tips : if you prefer milk chocolate, aim for creamy and smooth varieties, check labels to avoid artificial flavors .
storage guidance : store your chocolate chips in a cool, dry place; they can last up to a year if kept sealed away from moisture . -
1/2 cup pbfit powdered peanut butter
quality indicators : choose brands that have minimal additives ideally just peanuts and salt, the texture should be fine and powdery without clumps .
selection tips : don’t be fooled by cheaper alternatives; invest in good quality pbfit it makes all the difference in taste.
storage guidance : keep your powdered peanut butter in an airtight container at room temperature, where it can last up to six months . -
3 tablespoons coconut oil (melted)
quality indicators : opt for virgin or extra virgin coconut oil as it retains more nutrients and has a pleasant aroma .
selection tips : avoid refined versions unless you're looking for something neutral - flavored . storage guidance : coconut oil can solidify below room temperature but remains good indefinitely when stored correctly. -
2 tablespoons maple syrup or honey
quality indicators : pure maple syrup should have no additives listed on the label look for grade a or b depending on how robust you want the flavor . honey should be raw whenever possible; it’s tastier and packed with nutrients .- selection tips : for those who prefer sweetness without added sugars, choose agave nectar instead.
- storage guidance : both syrups keep well in their original containers at room temp .
-
a pinch of salt
simple but essential. aim for sea salt or himalayan pink salt as they enhance flavors beautifully.
signature seasoning blend
while we don’t traditionally think of seasoning blends when whipping up treats like these cups, there are still some fun additions you might consider.
-
spice combinations : consider adding cinnamon or nutmeg into your chocolate layer if you’re feeling adventurous trust me; it's delightful.
-
herb selections : while herbs aren’t common here, mint leaves could add an interesting twist if used sparingly alongside dark chocolate .
-
flavor enhancers : a drop of vanilla extract in either mixture really uplifts the overall taste profile don’t skip this one.
-
aromatic additions : sprinkle cocoa powder inside before sealing them off with more melted chocolate it intensifies that chocolaty goodness.
smart substitutions
if you're missing something from your pantry or just want to mix things up a few substitutions can save your day.
-
alternative options : swap out dark chocolate chips with white ones if you're craving something sweeter.
-
dietary swaps : for vegan options use dairy - free chocolates along with agave syrup instead of honey .
-
emergency replacements : out of coconut oil ? melted butter works too but note that it'll change the flavor slightly .
-
seasonal variations : when fall rolls around, try using pumpkin spice mixed into your filling recipe it gives everything such cozy vibes.
kitchen equipment essentials
alright folks, let’s talk tools because nothing's worse than getting halfway through cooking only to realize you're missing what you need .
must - have tools
1, silicone muffin tray – seriously game - changing. they make popping those cups out so easy - peasy . 1, microwave - safe bowls – you’ll definitely need these for melting all that yummy goodness. 1, small spatula – perfectly spreading melted chocolate evenly takes finesse i learned this after way too many messy attempts. 1, measuring spoons/cups – precision matters when baking, so don’t skimp here .
recommended appliances
1, microwave – yeah i know… not fancy but super convenient. 1, food processor (optional) – if blending becomes necessary during experimentation phase later on…
helpful gadgets
1, parchment paper liners (if using metal molds), they help prevent sticking and make cleanup easier . 1, kitchen thermometer you’ll want accurate temperatures while melting chocolates sometimes especially during summer heatwave scenarios . . .
home alternatives
if silicone is unavailable :
- regular cupcake trays work just fine too with some grease added beforehand.
pro ingredient tips
now we’ve covered our bases let’s sprinkle in some pro tips i wish someone had told me sooner :
selection secrets
always smell ingredients first their aroma tells half the story about freshness level.
quality markers
check expiration dates carefully nothing ruins a sweet treat faster than stale components . ., yikes..
storage solutions
label containers clearly; trust me trying to remember where everything went post - baking frenzy gets chaotic fast . . .
money - saving tips
buy ingredients in bulk wherever feasible especially non - perishables like peanut butter powders which usually save big bucks over time compared shopping small amounts regularly .
so there you have it a comprehensive guide filled with ingredient insights that'll set your path straight towards making scrumptious pbfit and peanut butter reese's cups. happy baking friends..
foolproof cooking steps
cooking can feel a bit overwhelming, but with some planning and organization, you can make it a breeze. here’s a step - by - step guide to ensure your culinary adventure is successful every time .
essential preparation steps
1, mise en place : this fancy term just means having everything ready before you start cooking, gather all your ingredients measuring them out ahead of time will save you from scrambling mid - cooking, for our pbfit peanut butter cups, have your chocolate chips, powdered peanut butter, coconut oil, maple syrup or honey, salt, creamy peanut butter, and powdered sugar measured and within reach .
1, prep techniques : if you're using silicone molds for the cups (which i totally recommend for easy removal), give them a quick wash and dry first, it helps if they’re clean and dry so nothing sticks. and trust me; nobody wants that mess when they’re trying to pop out their delicious treats.
1, time management : keep an eye on the clock as you work through each step of the recipe, we’ll be melting chocolate in increments don’t rush it. take about 30 seconds at a time in the microwave until it’s smooth .
1, organization tips : clean as you go. after pouring melted chocolate into molds or mixing ingredients together, wash those bowls right away if possible, it keeps your workspace tidy and makes cleanup way less daunting later on .
professional cooking method
1, step - by - step process :
- start by melting half your coconut oil along with the dark chocolate chips in short bursts until it's silky smooth .
- spoon one tablespoon of this mixture into each mold to create a solid base this should take about 5 - 10 minutes total .
1, temperature control : ensure that while melting chocolate in the microwave or over double - boiler methods (if that's more your style), you're keeping an eye on how hot things are getting not too hot because burnt chocolate is sad chocolate.
1, timing precision : after filling your molds with that melted goodness (and maybe taking a moment to admire how pretty it looks.), pop them into the freezer for about 10 minutes until they've set nicely.
1, success indicators : you’ll know you've done well when you see no shiny spots left in those shells after freezing they should look matte once set.
expert techniques
1, professional methods :
- when mixing up that pbfit filling with peanut butter and sweetener you want it smooth but not overly runny.
- taste as you go; adjust sweetness if needed since everyone's palate varies .
1, critical steps : make sure each layer is thick enough before moving onto adding toppings or fillings; otherwise they might crumble at unwrapping time which would be tragic considering how tasty these cups are meant to be.
1, precision points : when pouring more melted chocolate over filled cups aim for full coverage without leaks around edges. use a spoon to gently nudge sides if necessary .
1, quality checks : once everything's assembled back into the freezer for another 20 minute chill session you'll want to check that everything feels firm before digging in.
success strategies
1, troubleshooting tips : if your peanut butter filling seems too thick when mixing it’s okay. just add tiny amounts of coconut oil until it's spreadable enough without being runny .
1, quality assurance : always do taste tests along the way it ensures balance between flavors while also satisfying any nibbling urges during prep (no judgment here.) .
3 . perfect results guide : aim for even layers throughout; consistency will yield beautiful results both visually and texturally the best kind of treat experience.
4 . final touches : before serving those glorious pbfit peanut butter cups a sprinkle of sea salt atop can elevate flavor profiles even further…trust me on this one.
enjoy diving into these steps i mean who doesn’t love homemade treats ? with practice and maybe some trial & error you’ll find yourself whipping up perfect pbfit and peanut butter reese's cups like an old pro in no time.
success guaranteed tips
when you want to nail those pbfit and peanut butter reese's cups, a few insider tips can really make the difference, first off, always use high - quality chocolate it’s the star of the show. whether you lean towards dark or milk chocolate, your choice will impact flavor, also, don’t skip on melting techniques; using short bursts in the microwave ensures that it stays silky smooth without burning .
next up is consistency with your pbfit mixture; mix until it’s creamy but not too runny, you want it thick enough to hold its shape when you scoop it into molds, and here’s a little kitchen wisdom : if you're worried about leaks from your cups, just apply a little more melted chocolate at the seams when sealing them .
lastly, don’t rush the chilling process. patience pays off big time here allowing those beauties to set properly means less heartbreak later when they pop out cleanly .
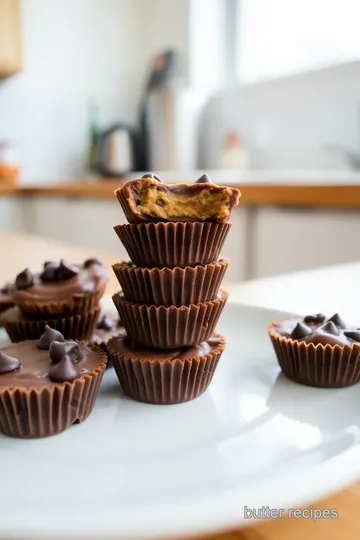
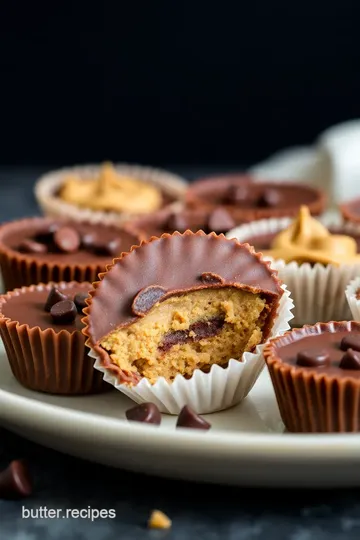
perfect presentation
now that you've made these delicious pbfit and peanut butter reese's cups, let’s talk about how to serve them up beautifully. presentation matters because we eat first with our eyes, right ? a simple yet effective plating technique is arranging them on a colorful plate or cake stand for height .
for garnishes, consider drizzling some melted chocolate over top or sprinkling crushed nuts for texture, fresh fruit slices like strawberries or bananas alongside add vibrant color and freshness definitely an eye - catcher.
as for serving suggestions ? these treats are perfect as dessert bites at parties or even as an afternoon snack with coffee, just remember to keep them chilled until serving for maximum yumminess.
storage & make - ahead
if you find yourself making these tasty delights in advance (which i totally recommend.), proper storage is key, keep your pbfit and peanut butter reese's cups stored in an airtight container in the fridge they'll stay fresh this way for about a week .
to preserve their amazing taste longer, consider freezing them. use parchment paper between layers in your container so they don't stick together a lifesaver when you're craving one late at night.
reheating isn’t necessary since they're best enjoyed cold or at room temperature, but if you’ve got leftovers that need reviving after being frozen ? just let ‘em thaw out naturally on the counter before diving back into deliciousness.
creative variations
feeling adventurous ? there are so many ways to shake things up with these cup creations. for flavor adaptations, swap out traditional peanut butter for almond or cashew butter you’ll still get that nutty goodness but with a twist .
dietary modifications are also easy; try using sugar - free sweeteners instead of maple syrup if that's your jam. if seasonal flavors tickle your fancy, think pumpkin spice during fall or maybe peppermint extract around christmas time ?
and why stop there ? regional variations could include adding coconut flakes for tropical vibes or even chili powder for a surprising kick it’s all about what inspires you.
expert faq solutions
got questions while whipping up these treats ? don’t sweat it i've been there too. one common concern is whether they’ll be too crumbly upon removal from molds, the trick is ensuring both layers are thick enough and allowing ample chill time between steps .
another point often asked : can i use regular peanut butter instead of pbfit powdered version ? sure thing but know that it'll change texture slightly due to extra oils present in regular nut butters .
troubleshooting guide tip : if melting chocolate starts seizing up (you know what i mean), just stir in another teaspoon of coconut oil it works wonders every single time.
complete nutrition guide
curious about what's packed inside each cup ? let me break it down. each pbfit and peanut butter reese's cup clocks approximately 120 calories filled with healthy fats from coconut oil and natural nut butters providing protein powerhouses.
the health benefits speak volumes too; using powdered ingredients cuts down on added sugars while retaining rich flavors and who doesn't love indulging guilt - free ?
portion guidance suggests sticking to one cup per serving as it's surprisingly satisfying you won’t feel deprived while still enjoying something oh - so - delicious every once - in - a - while treat without overdoing it.
PBfit Peanut Butter Cups with a Twist Card

⚖️ Ingredients:
- 1 cup dark chocolate chips (or milk chocolate chips, depending on your preference)
- 1/2 cup PBfit powdered peanut butter
- 3 tablespoons coconut oil, melted
- 2 tablespoons maple syrup or honey (for sweetness)
- A pinch of salt
- 1/2 cup creamy peanut butter (natural recommended)
- 1 tablespoon powdered sugar (adjust based on sweetness preference)
🥄 Instructions:
- Step 1: [Prepare Your Molds]: Use a silicone muffin tray or paper cupcake liners for easy removal. If using metal molds, lightly grease them with cooking spray.
- Step 2: [Melt the Chocolate]: In a microwave-safe bowl, combine the dark chocolate chips and half of the melted coconut oil. Microwave in increments of 30 seconds, stirring between each session until completely melted and smooth.
- Step 3: [Create the Chocolate Base]: Spoon about one tablespoon of the melted chocolate into each mold. Use a small spatula or spoon to spread it evenly across the bottom and slightly up the sides, forming a shell. Place in freezer for about 10 minutes to set.
- Step 4: [Make PBfit Mixture]: In another bowl, mix together PBfit powdered peanut butter, remaining coconut oil, maple syrup/honey, and a pinch of salt until well combined and smooth.
- Step 5: [Add Peanut Butter Filling]: Once your chocolate shells are set, spoon about one teaspoon of creamy peanut butter into each mold over the hardened chocolate layer.
- Step 6: [Top with More Chocolate]: Pour more melted chocolate over each filling until they are fully covered—about one tablespoon per cup should do it—making sure that all edges are sealed properly to prevent leaking during unwrapping.
- Step 7: [Set Again]: Return your filled molds back to the freezer for an additional 20 minutes or until fully set.
- Step 8: [Serve & Enjoy]: Pop them out from their molds by gently pressing from below if using silicone molds or carefully peeling away paper liners if used; serve chilled or at room temperature!
Previous Recipe: Slow Cooked Turkey Breast with Spicy Flavor
Next Recipe: Chill Peanut Butter Brownie Dreamy Dessert