Bake Victoria Sponge Cake
Craving a delightful, fluffy Victoria Sponge Cake? Let me guide you through my kitchen-tested recipe for this classic, elegant dessert that's perfect for tea time!

Oh my gosh, let me take you back to one of those perfect, sunlit afternoons. picture this: it's a saturday, and my best friend lily and i decide to have a mini tea party.
We set up our little table in the yard with fancy napkins and twinkling fairy lights, hoping to recreate that classic british dessert experience.
And what was the star of the show? you guessed it— bake victoria sponge cake | elegant & timeless . honestly, there’s something about this cake that feels like a hug from the past.
It’s light and airy , filled with whipped cream and jam, just like the ones queen victoria herself would’ve enjoyed at her tea parties.
Recipe Overview
So, let’s dive into why this traditional victoria sponge is so beloved. this cake has its roots in england, dating back to the reign of queen victoria in the 19th century.
Back then, it was a favorite among the upper class and is still a staple in british baking traditions today.
Fast forward a couple of centuries, and it’s now embraced by the world. you can find it on pastry shop shelves and family dinner tables alike, making this layered sponge cake a timeless favorite.
Now, if you’re worried about complexity—don’t be! this recipe falls into the medium difficulty category. it does take a bit of care with mixing and baking techniques, but trust me, anyone can nail this if you follow the steps.
The total time? just about 40 minutes . prep takes 15 minutes , and then you’re watching it bake for around 25 minutes .
And when you’re done, you’ll yield about eight delightful servings —perfect for sharing with friends or keeping all to yourself (no judgment here!).
Key Benefits
Now, let’s talk about why you need this cake in your life. first off, it’s not just delicious—it’s also packed with some health benefits! okay, so we’re not calling it health food, but that fluffy sponge cake is made with quality ingredients that are way better than store-bought stuff.
Using fresh cream and real fruit jam adds some nutrients without all those sneaky preservatives.
Plus, this cake shines for several special occasions . whether it’s a birthday bash, a fancy tea party, or just a tuesday that feels like a celebration, it fits right in.
And if you’re looking for elegant dessert ideas , this is it! it stands out from other simple cake decoration options on the table—people love the contrast of the rich jam and the airy whipped cream.
One of my favorite perks? it’s surprisingly versatile. while traditional victoria sponge is fantastic as it is, you can easily riff on this recipe.
Add a touch of lemon zest for a zing or swap the jam for some seasonal berries. there’s a whole rainbow of flavor variations waiting for you!
In short, this cake isn’t just a treat; it’s a piece of history. nothing says comfort and luxury quite like a slice of moist sponge cake served with hot tea.
It’s a reminder of simple pleasures, inviting everyone to slow down and savor the moment.
So, ready to take this classic treat from mixing bowl to your table? let’s gather those ingredients and get into the fun part of baking! we’ll whip up something truly special that’ll have everyone asking for seconds.
Stay tuned for the ingredient list, and let’s make some magic happen!
Essential Ingredients Guide for Baking
Oh my gosh, if you’re diving into the sweet world of baking, you gotta know the essentials. whether it's for a classic british dessert like a victoria sponge cake or just some afternoon treats, having the right ingredients in your pantry makes a world of difference.
Plus, knowing how to use them right? total game-changer. let’s break this down!
Premium Core Components
First up, we’ve got the Premium Core Components of any baking adventure. We're talking the stuff that lays the foundation for success. Here are some must-know details:
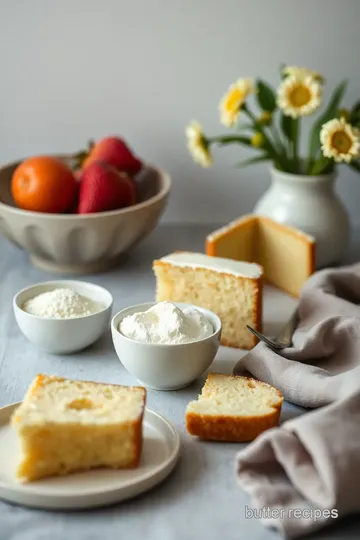
- Butter : Use 1 cup (225 g) unsalted butter , softened. Look for that creamy, dreamy texture—no yellow streaks here!
- Sugar : You need 1 cup (200 g) granulated sugar . White sugar is clean and sweet—perfect for that fluffy sponge cake recipe .
- Flour : Grab 2 cups (240 g) all-purpose flour . It should feel soft and powdery. If it’s lumpy, pass on that!
- Baking Powder : 2 tsp is crucial for that lift.
- Eggs : Fresh large eggs are a must! Four of those babies will do.
Now, about storage—you’ll want to keep these goodies in cool, dry spots. butter lasts about 1-3 months in the fridge, and flour can go for up to a year in the pantry if sealed properly.
Signature Seasoning Blend
Moving on to the fun part—the Signature Seasoning Blend ! Getting the right flavors is key to any delightful bake.
- Vanilla Extract : A splash goes a long way. It gives your cake that rich flavor. Choose pure if you can!
- Salt : Just a pinch balances the sweetness. Seriously, don't skip it!
- Jam : Use quality raspberry or strawberry jam for that filling. Fresh is fab, but good-quality store-bought works too.
Let’s not forget that whipped cream filling ; it can be your best friend here. Beat it until it’s fluffy—about soft peaks —for that divine texture!
Smart Substitutions
Baking isn’t just about having the right stuff; sometimes, you gotta think on your feet! That’s where Smart Substitutions come into play:
- Butter Alternatives : Don’t stress! If you're out of butter, try using coconut oil . Just melt it first!
- Egg Replacement : Flaxseed mixed with water can work in a pinch—2 tablespoons of flaxseed with 3 tablespoons of water is a good swap.
- Flour : No all-purpose flour? No problem! Rice flour or almond flour can be fun alternatives.
Being flexible makes all the difference, and you might even stumble onto something you love more.
Kitchen Equipment Essentials
Finally, let’s talk about Kitchen Equipment Essentials . You don’t need a fancy kitchen to whip up a delightful cake. Here’s what you should have:
- Mixing Bowls : A must-have! Get a set that nests for easy storage.
- Electric Mixer : Even a hand mixer will do. We’re not picky here!
- Cake Pans : You’ll want two 8-inch round pans to bake your layers.
- Cooling Rack : Essential for letting those lovely layers cool without getting soggy!
Pro tip: Clean up as you go! Trust me; it makes for a stress-free baking environment.
So now that we’ve armed you with all this super helpful intel, you might be wondering how to put it all together for that stunning victoria sponge cake ? well, hang tight, 'cause up next we’re diving into the step-by-step instructions to create this elegant & timeless treat.
Get ready to bake like a pro!
Professional Cooking Method: Perfecting Your Victoria Sponge Cake
Baking is both an art and a science, and when it comes to making an elegant dessert like a victoria sponge cake , every little detail counts.
Today, we’ll dive deep into the essential preparation steps and a step-by-step process that’ll have even beginner bakers strutting around like pros.
Let’s channel our inner mary berry and whip up something delightful!
Essential Preparation Steps
First off, let’s talk mise en place —it’s a fancy way of saying to get your act together before diving into the mixing bowl.
Gather all the ingredients like unsalted butter , sugar , and jam well beforehand. seriously, this will save you from rummaging through cupboards when you’re knee-deep in batter.
Then, there’s time management —baking isn't just about great ingredients; it's also about juggling your time. set a timer or two! for this cake, you'll need to know that the oven should be preheated to 350° f ( 175° c) right off the bat, and that the cook time will be about 22- 25 minutes .
A little prep goes a long way in avoiding chaos in the kitchen.
Organization is key too. i like to use separate bowls for my dry and wet ingredients. makes it easier to clean up later too—trust me, a happy kitchen is a tidy kitchen.
And don't forget safety considerations . keep your area clean, and watch your fingers around appliances. cooking burns are totally no bueno!
Step-by-Step Process
Now for the fun part—let’s bake! Here’s a clear, numbered process to follow.
-
Preheat your oven to 350° F ( 175° C) and grease those two 8-inch round cake pans. No sticking allowed!
-
In a large bowl, cream 1 cup of softened butter with 1 cup of granulated sugar until it’s looking fluffy and light. We're aiming for a sort of cloud-like texture.
-
Add 4 large eggs , one at a time, giving it a good mix after each one. Make sure it's well incorporated.
-
In a separate bowl, whisk together 2 cups of flour , 2 tsp of baking powder , and 1/2 tsp of salt .
This is your dry mix that helps the cake rise.
-
Slowly incorporate the dry mix into the wet mixture. Alternate with 2 tbsp of milk until just combined—don't overdo it! You want a light and airy cake , not a brick.
-
Divide the batter evenly between the prepared pans and pop them in the oven. set a timer for 22- 25 minutes , but check with a toothpick around the 22-minute mark.
When it comes out clean, it’s done!
-
Allow them to cool for about 10 minutes in the pans, then transfer to a cooling rack. Don't rush this—let that fluffy sponge cake cool down before we frost it.
-
Whip 1 cup of heavy cream with 3 tablespoons of powdered sugar until soft peaks form. You know it's ready when it holds its shape.
-
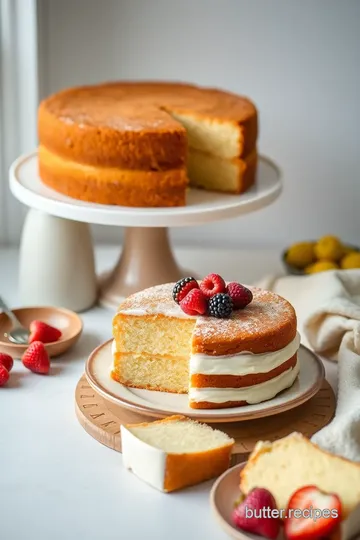
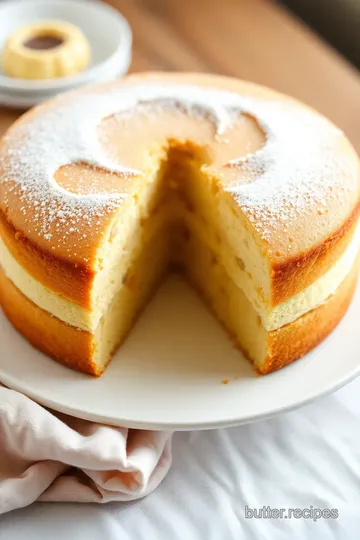
Spread 1/2 cup of your favorite jam (I go for raspberry , but strawberry’s great too) on one layer, add that delicious whipped cream, and stack the second layer on top.
-
Dust lightly with powdered sugar if you're feeling fancy, slice it up, and get ready for compliments!
Expert Techniques
Alright, so let’s make sure we nail this recipe. here are some critical steps to keep in mind. make sure everything is at room temp before you start! cold ingredients don’t mix well—says the baker who learned that the hard way.
Keep an eye on the oven temperature. Overbaking can ruin the moistness— 22- 25 minutes should be your guide, but everyone's oven is a bit different. Trust your instincts!
And, oh boy, let’s chat about quality checkpoints . when your cake has a golden brown color and a gentle spring back when you touch it, you’ve got a winner.
If it seems too hard or dry, you might have left it in too long.
And here’s a little troubleshooting tip: If your cake isn’t rising, check your baking powder. It could be expired!
Success Strategies
We all mess up sometimes, but here’s how you can avoid common pitfalls. firstly, overmixing is a no-go. mix until just combined—too much love can make your cake dense.
No one wants that!
Always taste as you go—quality assurance is key! and if you’re planning a tea party, the moist sponge cake techniques are crucial.
The flavors need to shine. make this cake ahead of time! it’s a great make-ahead option. just wrap it well and store it in the fridge.
It actually tastes better the next day.
So go ahead and bake your victoria sponge cake | elegant & timeless —you’ll impress your friends and enjoy a slice of british tradition at home.
Just remember, it's all about having fun and making something delicious.
Additional Information...
And hey, if you're looking for even more ideas and inspiration for your next baking adventure, stay tuned for the next section where we’ll dive into other delightful recipes that complement your newfound cake-making skills!
Pro Tips & Secrets
Alright, pals, let’s dive into the world of bake victoria sponge cake | elegant & timeless . if you want to impress your folks at tea time or just indulge that sweet tooth, i have some thoughts for you.
First things first, remember this: don’t skip the creaming! creaming your butter and sugar together until it’s light and fluffy is what gives your sponge that airy texture.
It’s a game changer, trust me.
Oh, and if you’re short on time (who isn’t, right?), here’s a time-saving tip : prep your ingredients ahead of time! measure out your flour, sugar, and all that jazz a day before.
This little trick makes assembly so much quicker. and let’s be real: nobody wants to be scrambling around for ingredients when you’re halfway through baking.
Now, to enhance that flavor even more , consider adding a splash of good quality vanilla extract. it'll transform your sponge cake from good to drop-dead delicious .
And for that fancy look when you serve it, keep it simple. a dusting of powdered sugar on top makes everything look so much more refined .
Perfect Presentation
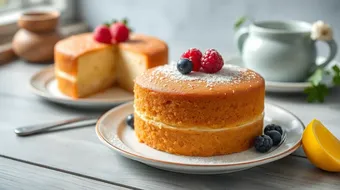
Let’s talk pretty cakes! when it comes to plating your victoria sponge, think elegance with a side of charm . layering is key here.
Place your bottom layer on your serving platter, spread that raspberry jam like you’re painting a canvas, then pile on that whipped cream.
Just imagine the bliss when your friends see those fluffy layers!
For color combinations , consider vibrant jams – strawberry or even a homemade lemon curd for a pop of color.
You can also top off the cake with fresh berries. raspberries or strawberries not only give a splash of color but add a tart contrast to the sweetness.
And hey, we eat with our eyes first, am i right?
Oh, and if you want to kick your presentation up a notch, you can get fancy with a squeeze bottle for drizzling.
A swirl of cream around the edge not only looks posh but also invites folks in for a bite!
Storage & Make-Ahead
Now if you're like me, your sweet tooth doesn't just fade after one slice. you might want to make it ahead or save some for later.
Cool the layers completely, wrap them up tightly in plastic wrap, and store them in the fridge if you want them to stay fresh for about three days .
If you want to keep it longer, pop it in the freezer! just make sure it’s really wrapped well – no freezer burn, please! when you’re ready to enjoy, let it defrost in the fridge overnight.
Easy peasy!
Creative Variations
Feeling adventurous? here’s where you can unleash your inner baker! flavor adaptations are endless! try adding some lemon zest for a zesty kick or swap out the filling for chocolate ganache for a chocolate lover's dream.
Not a fan of jam? go with a cream and berry filling !
And don’t forget to switch it up seasonally! add pumpkin spice in the fall or layer with mango curd in the summer.
It keeps things fresh and exciting. your friends will be begging you for your secret!
Complete Nutrition Guide
Let’s be real, nobody’s making a cake without thinking about the deliciousness first! but it’s good to know what’s in it too.
Each slice of your light and airy cake serves up about 320 calories . it’s comforting to enjoy a slice without too much guilt, especially when you savor every bite!
Of course, you can tweak the recipe based on dietary needs. swap out some ingredients if you’re & trying to be healthier! for example, using greek yogurt in place of heavy cream can cut down on fat but still give you that creaminess.
Expert FAQ Solutions
So, you’ve got questions? i’ve got answers! one common query is, “what if my cake doesn't rise?” ah, fear not! if your baking powder is old, that’s likely the culprit.
Always check that little date on the package. also, room temperature ingredients are a must for those fluffy results.
If you face any mishaps, remember: fail forward! every baking experience is a chance to learn. whether you overmixed and ended up with a dense sponge or forgot the sugar, we’ve all been there.
Just be patient with yourself.
Final Thoughts
Making a bake victoria sponge cake | elegant & timeless doesn’t have to be daunting! it’s all about confidence and practice .
So grab your apron and don’t hold back. this cake will not only impress your guests but also put a smile on your face as you indulge in a classic british dessert.
Let your creativity flow and enjoy every minute in the kitchen! you got this!
Bake Victoria Sponge Cake Card
⚖️ Ingredients:
- 1 cup (225 g) unsalted butter, softened
- 1 cup (200 g) granulated sugar
- 4 large eggs
- 2 cups (240 g) all-purpose flour
- 2 tsp baking powder
- 1/2 tsp salt
- 2 tbsp milk
- 1 cup (240 ml) heavy whipping cream
- 3 tbsp powdered sugar
- 1/2 cup (150 g) raspberry or strawberry jam
🥄 Instructions:
- Step 1: Preheat the oven to 350°F (175°C). Grease and flour two round cake pans.
- Step 2: In a large mixing bowl, cream together softened butter and granulated sugar until light and fluffy.
- Step 3: Add eggs one at a time, mixing well after each addition.
- Step 4: In a separate bowl, whisk together flour, baking powder, and salt.
- Step 5: Gradually add dry ingredients to the creamed mixture, alternating with milk. Mix until just combined.
- Step 6: Divide the batter evenly between the prepared cake pans.
- Step 7: Bake for 22-25 minutes, or until golden brown and a toothpick inserted into the center comes out clean.
- Step 8: Let cakes cool in pans for 10 minutes, then transfer to a cooling rack.
- Step 9: While the cakes cool, whip the heavy cream with powdered sugar until soft peaks form.
- Step 10: Once cooled, place one cake layer on a serving platter. Spread with jam and then top with whipped cream. Place the second cake layer on top.
- Step 11: Optionally, dust with powdered sugar, slice, and serve.
Previous Recipe: How to Bake Honey Walnut Pastry Delight: 5 Amazing Tips for Success!
Next Recipe: My Grandmother’s Moist Bake Lemon Ricotta Cake with Sweet Glaze