Butterfinger Balls
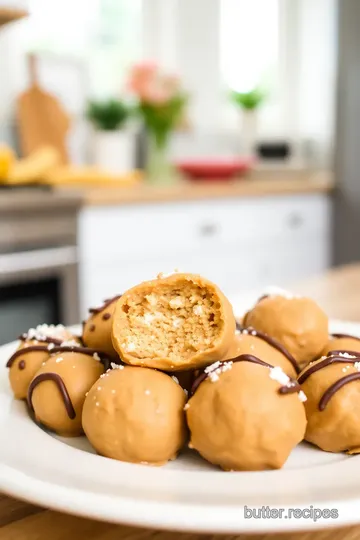
Try these Butterfinger Balls! Ready in just 30 minutes, this easy, no-bake dessert features creamy peanut butter, chocolate, and Butterfinger bars. Perfect for parties, yields 12 sweet bites!

- about introduction
- the ultimate guide to butterfinger balls
- the magic behind this recipe
- health & nutrition highlights
- recipe at a glance
- perfect ingredients selection
- kitchen equipment essentials
- perfect cooking technique for butterfinger balls
- game - changing tips for making butterfinger balls
- perfect presentation for butterfinger balls
- storage & make - ahead tips for butterfinger balls
- creative variations for butterfinger balls
- expert faq solutions about butterfinger balls
- complete nutrition guide for butterfinger balls
- Recipe Card
about introduction
welcome to the delightful world of butterfinger balls. these easy - to - make treats are not only a chocolate lover’s dream but also a fun nod to the rich culinary heritage of sweet indulgences, while we know them today as creamy, crunchy, and utterly irresistible,...
what sets apart these sweet morsels, rated as a must - try in any dessert lover's dictionary, is the blend of creamy peanut butter and crunchy butterfinger bits rolled into a ball and enrobed in silky chocolate, these butterfinger balls pack a punch of flavor and nostalgia that’s hard to resist, not only are they easy to whip up in just about 30 minutes, but they also require minimal ingredients, making them perfect for both unexpected visitors and planned gatherings, seriously, if you’ve got peanut butter and chocolate, you’re halfway there.
the ultimate guide to butterfinger balls
these delicious bites have a rich culinary heritage that speaks to their popularity across generations, inspired by butterfinger bars, the origin story of these little balls is almost as fun as the recipe itself, imagine sitting in a cozy kitchen, combining a few simple ingredients, and before you know it, you’re transported to a candy store vibe, that’s the kind of magic butterfinger balls bring .
they've managed to grab the hearts of millions, becoming a staple in dessert tables and candy buffets at parties and special occasions alike, not just popular in the united states, they’ve garnered love from international corners too. it’s this kind of cultural significance that keeps people coming back for more, plus, who can say no to a sweet treat that brings joy and comfort ?
the magic behind this recipe
the true beauty of butterfinger balls lies in their unique flavor combinations , when that creamy peanut butter meets the chocolatey crunch of butterfinger, it’s like a flavor festival happening right in your mouth. and let’s talk about the techniques these beauties are foolproof, i once tried making them late at night, flustered and tired, and i was still able to pull it off without a hitch .
with this expert - tested method , even novice bakers (like me.) can succeed at creating these little spheres of happiness, trust me, i’ve made my fair share of cooking blunders, but these balls are forgiving if you can roll a ball with your hands, you’re golden. plus, i’ve got some time - saving tips like letting the chocolate harden in the fridge because we all have those moments when we just want to dig in without the wait .
health & nutrition highlights
now, before you dive right in, let’s chat about the health and nutrition highlights of these excellent snacks. each butterfinger ball provides a burst of energy with a balance of protein from the peanut butter and some sweetness to satisfy those cravings, with about 210 calories per ball and a hit of healthy fats, they definitely can fit into an active lifestyle .
for those mindful of dietary considerations, it’s worth mentioning that using natural peanut butter can elevate the nutritional profile, making the balls a little healthier while still being delicious, talk about a win - win. plus, the wellness advantages of snacking on these treats include feeling a sense of happiness with each bite, food is love, after all, right ?
recipe at a glance
for a quick summary, here’s the recipe at a glance : you’ll only spend about 20 minutes in preparation,
perfect ingredients selection
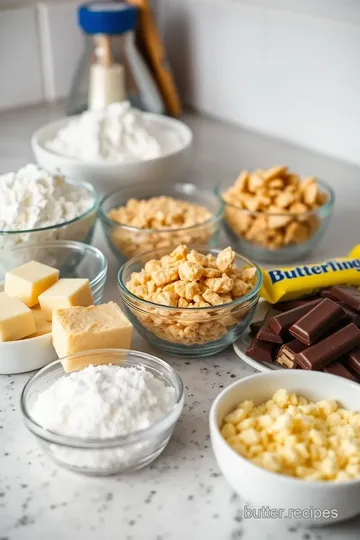
premium core ingredients
when you're making butterfinger balls, there are a few key ingredients that really make all the difference, let’s break them down, shall we ?
-
1 cup creamy peanut butter : i always opt for natural peanut butter, just check the label for ingredients; it should only say peanuts and maybe a little salt, no added sugars or anything weird.
-
1/2 cup unsalted butter, softened : softened butter is a must, you don’t want any lumps when mixing trust me, no one wants a buttery surprise.
-
2 cups powdered sugar : this is where the sweetness comes from, if you want them extra sweet, feel free to add a little more though i usually don’t, because the butterfinger bars will add plenty of punch.
-
1 1/2 cups crushed butterfinger bars : use about six bars for this, grab a rolling pin and have fun smashing those candies, it’s like therapy but ways sweeter, keep an eye for freshness; the crunch will be way better with fresh bars .
-
2 cups chocolate chips : choose either semi - sweet or milk, depending on your taste buds, i usually go semi - sweet, but milk chocolate makes it feel like an indulgent treat.
-
1 tablespoon coconut oil (optional) : this little gem helps the chocolate melt smoother, if you don’t have any, don’t sweat it .
for storage, once you’ve made these sweet balls, keep them in the fridge in an airtight container, i almost always find they disappear faster than i can snap a pic.
signature seasoning blend
while butterfinger balls don’t need much seasoning, using some extra zest can enhance their deliciousness.
-
spice combinations : if you're feeling adventurous, a dash of cinnamon could give them a unique twist, it’s not traditional, but hey, food experimentation leads to yummy discoveries.
-
herb selections : not exactly what you’d add here, but imagine a sprinkle of sea salt on top for that sweet - and - salty vibe, just a pinch can go a long way.
-
flavor enhancers : a touch of vanilla extract can amp up the flavors, just half a teaspoon mixed in with your creamy mixture does wonders .
-
aromatic additions : i’ve tried adding a splash of almond extract once, and wow, talk about a flavor bomb. it’s not for everyone, but it’s definitely worth a try if you’re feeling bold.
smart substitutions
life happens, and sometimes we don't have all the right ingredients, no worries. here are some smart swaps :
-
alternative options : got crunchy peanut butter ? go for it. it will give your butterfinger balls an extra crunch you might just love .
-
dietary swaps : for a vegan version, use maple syrup instead of butter and try dairy - free chocolate chips, they still taste fabulous.
-
emergency replacements : no butterfinger bars ? chopped pretzels or toffee bits can be a fun alternative, adding different textures .
-
seasonal variations : around halloween, i’ve made these with pumpkin spice added to the mix for a seasonal twist, so fun.
kitchen equipment essentials
to whip up these butterfinger balls, your kitchen should be pretty stocked with the essentials .
-
must - have tools : a mixing bowl and spatula are your best friends here, a scoop can help with portioning, too.
-
recommended appliances : if you have an electric mixer, this will save you elbow grease, but honestly, it’s easy to mix by hand as well it builds character.
-
helpful gadgets : use a microwave - safe bowl for melting chocolate, and a fork for dipping ? you’ll be a pro in no time .
-
home alternatives : no cookie sheet ? no problem. just grab a flat plate lined with parchment paper; it’ll work like a charm.
pro ingredient tips
alright, let’s circle back to some insider secrets i’ve learned through trial and error .
-
selection secrets : always inspect your chocolate chips, choose high - quality brands trust me, your taste buds will thank you.
-
quality markers : look for fresh butterfinger bars too, they should not be broken to bits before you even start mixing .
-
storage solutions : i keep my balls in a sealed container in the fridge for up to a week, but they usually don’t last that long seriously.
-
money - saving tips : buy your peanut butter in bulk, it often saves a ton of money plus, you’ll have it on hand for future cravings.
so there you have it. with this guide, your butterfinger balls are destined to be a hit, enjoy rolling them up and indulging in every bite.
perfect cooking technique for butterfinger balls
essential preparation steps
before diving into the delicious world of butterfinger balls , let’s take a moment to get organized, first off, it’s all about the mise en place. gather your ingredients : creamy peanut butter, unsalted butter, powdered sugar, crushed butterfinger bars, chocolate chips, and if you like, some coconut oil .
next, prep is key. soften that butter ahead of time this little move saves a lot of arm power, break up those butterfinger bars before you start mixing, they’re so good that i often find myself sneaking a piece or two. keep an eye on the clock; the chilling step is crucial, that’s when your balls get firm enough to handle .
organization matters too, lay out your tools : a mixing bowl, spatula, a cookie sheet, and parchment paper, trust me, having everything at hand avoids a last - minute scramble .
professional cooking method
now, let’s roll up our sleeves and get started with the step - by - step process, in a large mixing bowl, combine the softened butter and peanut butter, an electric mixer makes this easy, but a good ol’ spatula works just fine too, mix until it’s smooth and creamy, you want that comforting aroma wafting up who can resist ?
next, gradually add in the powdered sugar, this part gets a tad messy, but it’s all part of the fun. mix until it’s well combined and thick this is where the real sweetness comes in, fold in the crushed butterfinger bars for that extra crunch .
scoop about a tablespoon of the mixture and roll it into a ball, don’t be afraid to make a mess, it just means you’re getting into the spirit of it. place them on the lined cookie sheet, you should end up with about 12 of these little babies .
time for a chill session. pop the cookie sheet in the freezer for about 10 - 15 minutes, ensuring they’re firm enough to handle .
while they chill, let’s melt the chocolate, use a microwave - safe bowl and go for 30 - second increments, stir in between sessions to avoid seizures you know, chocolate mishaps.
expert techniques
once the filling is chilled, it’s chocolate - coating time, using a fork, dip each frozen ball into the melted chocolate, letting the excess drip back into the bowl, strategic shaking is key here; too much chocolate can overwhelm that glorious peanut butter center, place each coated ball back on the parchment .
patience pays off, my friends. let these chill again at room temp or speed things up by putting them in the fridge for another 10 - 15 minutes, the chocolate needs to set, or else, you’ll be in a chocolatey mess .
success strategies
now, there may be some hiccups along the way, if your chocolate is too thick, a splash of coconut oil can smooth it out beautifully, and if the mixture ends up a bit too sticky, trust me, just keep your hands dusted with powdered sugar, and you’ll be golden .
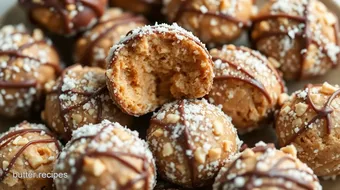
once you’ve finally let your butterfinger balls set and you’re ready to dig in, you can roll them in a little extra powdered sugar for that perfect final touch .
remember, cooking is all about the journey, so enjoy every bite. and hey, don’t stress about perfection; cooking challenges are just opportunities for creativity to shine .
well, there you have it. with this guidance, you’ll craft butterfinger balls that not only look fantastic but taste heavenly, gather your friends and serve these delightful treats with confidence, happy cooking, and enjoy the delicious chaos that follows.
game - changing tips for making butterfinger balls
making butterfinger balls can feel like a bit of an adventure, and i’ve learned a few tricks along the way, first, always use fresh butterfinger bars , trust me, the flavor and crunch are essential to nailing that nostalgic sweetness .
when it comes to mixing up the peanut butter and butter, an electric mixer definitely speeds things up, but heck, good ol’ fashioned elbow grease works too. just make sure it’s creamy and well - blended – you don’t want any lumps ruining the texture, and here’s a pro tip : chill, chill, chill . letting the mixture chill in the freezer prevents a gooey mess when you coat them in chocolate .
perfect presentation for butterfinger balls
let’s talk plating because, come on, who doesn’t love a pretty dessert ? for butterfinger balls, i like to use a simple white plate, it gives that gorgeous chocolate a chance to shine, you can get fancy with garnishes , like drizzling a bit of melted chocolate on top or sprinkling crushed peanuts for a fun crunch .
serving suggestions ? try using colorful cupcake liners, not only do they look adorable, but they also make each ball feel like a special treat, oh, and i usually have a handful of different flavors handy, so when friends come over, they can play a little “guess the flavor” game, fun, right ?
storage & make - ahead tips for butterfinger balls
now, let’s be real : these butterfinger balls are so good that you might just eat them all at once. but if you manage to resist (props to you.), here are some great storage tips, store them in an airtight container in the fridge, they’ll last about a week, but who’s counting ? if you want to make them ahead of time, freeze them for up to three months, just layer them between parchment paper so they don’t stick together .
when you’re ready to enjoy, simply pull them out and let them come to room temp, or if you’re impatient like me, munch on one straight from the freezer .
creative variations for butterfinger balls
feeling adventurous ? let’s mix it up. one of my favorite adaptations is switching out the peanut butter for almond butter, it adds a nutty twist that’s downright delicious, depending on the season, you could also throw in some crushed peppermint candies during the holidays .
for those with dietary restrictions, consider using grain - free alternatives like almond flour instead of powdered sugar for variety, there’s even room for a little spiciness; try a pinch of chili powder for a surprising kick. talk about a party on your palate.
expert faq solutions about butterfinger balls
i get questions all the time. one common concern is about the chocolate coating, if your chocolate seizes up, don’t panic. just add a splash of coconut oil to the mix while it melts – it usually does the trick, another frequent one is about the thickness of the mixture, if it’s crumbly, add more peanut butter until it’s easy to roll into balls .
lastly, if you're ever unsure how to tweak the sweetness, just give it a taste. it’s super forgiving, so trust your instincts, and remember, mastering butterfinger balls is all about enjoying the process .
complete nutrition guide for butterfinger balls
so, what about that guilty pleasure factor ? each butterfinger ball packs a punch at around 210 calories , while they’re definitely a treat, they do bring some protein with that peanut butter goodness, plus, there’s a fair share of healthy fats, especially when you stick to natural nut butters .
if you’re keeping an eye on portions, it helps to have a little measuring scoop handy, try to stick to one (or maybe two.) at a time – moderation is key, right ? and if someone ever complains about dessert calories, remind them of the joy these little guys bring.
anyway, if you’re ready to spread some joy, grab those ingredients and start whipping up these butterfinger balls.

Butterfinger Balls Card
⚖️ Ingredients:
- 1 cup creamy peanut butter (preferably natural)
- 1/2 cup unsalted butter, softened
- 2 cups powdered sugar (plus extra for rolling)
- 1 1/2 cups crushed Butterfinger bars (about 6 bars)
- 2 cups chocolate chips (semi-sweet or milk, based on preference)
- 1 tablespoon coconut oil (optional, for smoother chocolate coating)
🥄 Instructions:
- Step 1: Prepare Your Workspace: Clear your countertop and gather all ingredients and equipment: mixing bowl, spatula, cookie sheet, parchment paper, and a microwave-safe bowl.
- Step 2: Make the Filling: In a large mixing bowl, combine the softened unsalted butter and creamy peanut butter. Use a spatula or electric mixer to cream them together until smooth and well incorporated.
- Step 3: Add Sugar and Butterfinger: Gradually add powdered sugar to the butter and peanut butter mixture, mixing until well combined. Fold in the crushed Butterfinger bars until evenly distributed.
- Step 4: Form the Balls: Scoop out about 1 tablespoon of the mixture and roll it into a ball in your hands. Place the balls onto a parchment-lined cookie sheet. Repeat until all of the mixture is used.
- Step 5: Chill the Balls: Place the cookie sheet in the freezer for about 10-15 minutes, until the balls are firm to the touch.
- Step 6: Melt the Chocolate: While the balls are chilling, melt the chocolate chips and coconut oil (if using) in a microwave-safe bowl. Heat in 30-second intervals, stirring in between, until completely smooth.
- Step 7: Coat the Balls: Remove the chilled balls from the freezer. Using a fork, dip each ball into the melted chocolate, shaking off any excess. Return the coated balls to the parchment paper.
- Step 8: Let Them Set: Allow the chocolate coating to harden at room temperature or refrigerate for an additional 10-15 minutes.
- Step 9: Finish and Serve: Once the chocolate has set completely, you can roll the balls in additional powdered sugar for a finishing touch. Serve immediately or refrigerate until ready to enjoy.
Previous Recipe: Quick One Pan Honey Butter Peas Delight
Next Recipe: Grilled Shrimp T-Bottom Pouch Butterflies