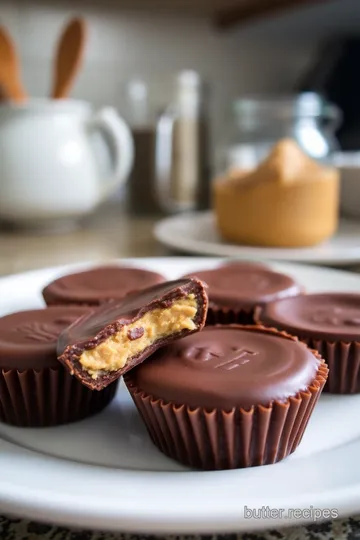
Decadent Homemade Reese’s Peanut Butter Cups
Wondering about reese's peanut butter cups calories? I've perfected my homemade recipe for these creamy, two-bite delights. Let me share my tasty secrets!

- A Sweet Trip Down Memory Lane
- History in a Cup
- What You Need to Know
- Why Eat These Peanut Butter Delights?
- Let’s Bit Into It!
- Essential Ingredients Guide to Satisfy Your Sweet Tooth
- look into into the World of Professional Cooking
- Pro Tips & Secrets for Perfect Peanut Butter Cups
- Perfect Presentation: Make Them Pop!
- Storage & Make-Ahead Tips
- Creative Variations: Switch It Up!
- Complete Nutrition Guide: Know What's in It
- Expert FAQ Solutions
- Recipe Card
A Sweet Trip Down Memory Lane
Okay, picture this: it’s a rainy saturday afternoon, and i’m around 10 years old. my friends and i are at the kitchen table, watching my mom work her magic with ingredients.
She’s whipping up some homemade treats, and the smell of sweet and savory snacks fills the air. that day, she made these decadent homemade reese’s peanut butter cups .
Oh my gosh, talk about a good time! fast forward to now, and i'm here sharing this recipe that lights up my nostalgia like a christmas tree! trust me, you aren’t just making dessert; you’re making memories.
Now, if you’ve ever wondered about those reese's peanut butter cups calories , don't worry, we've got you covered. the thing is, these homemade treats way better than the store-bought ones, and i’ll spill all the details on how you can whip them up yourself.
So, roll up your sleeves and let’s get into it!
History in a Cup
Did you know that reese’s peanut butter cups have been around since the 1920s? it’s true! a brilliant guy named harry burnett reese developed them after working with the hershey chocolate company.
Over the years, people fell head over heels for this peanut butter chocolate cups combo, and honestly, who wouldn’t? today, they’re everywhere! from halloween spoils to cozy movie marathon snacks, they’re a classic.
And making them at home? it’s a game-changer! while it sounds fancy, it’s really just a sweet diy adventure. you’ll have your friends thinking you’re a kitchen wizard with this homemade peanut butter cups recipe .
Let’s keep it real: it’s fun, and you get to control what goes in, making it perfect for special occasions or just to satisfy that sweet craving.
What You Need to Know
Now, let’s chat about resources. this recipe has a medium level of difficulty , meaning you’ll need a bit of patience, especially when it comes to chocolate tempering techniques .
Trust me, your efforts will pay off.
In terms of timing, here’s the lowdown: you’re looking at about 55 minutes total— 15 minutes to prep, 30 to chill, and 10 to melt that chocolate magic.
Cost-wise, it won't break the bank either. depending on how much you splurge on your chocolate, you can make around 12 cups for under $10!
Why Eat These Peanut Butter Delights?
These homemade reese’s cups aren’t just tasty; they come with a side of benefits. first, let’s talk health. you control the ingredients, so you can use less sugar and even choose gluten-free options.
Plus, if you’re on the lookout for low-calorie dessert recipes , this one can work for you if you manage your portions wisely.
One serving has roughly 150 calories —not bad for a treat that’ll hit the sweet spot!
They’re also kid-friendly recipes , perfect for fun kitchen time with your little ones. whether it’s a birthday bash or just a saturday night in, these beauties are great for party dessert ideas .
You could dazzle your guests with delicious treat variations , like adding a sprinkle of sea salt on top or even using a splash of peppermint extract for a seasonal twist.
Let’s Bit Into It!
So, ready to get into the nitty-gritty ingredients? gather your chocolate chips, creamy peanut butter, and a few other essentials.
We’re gonna create something special, just like my mom did all those years ago. by the end, your homemade peanut butter cups will be ready to impress, not just you, but everyone who lays eyes—and taste buds—on them!
Let’s dive right into the ingredients and get started on this magical journey into homemade sweetness!

Essential Ingredients Guide to Satisfy Your Sweet Tooth
Oh man, if you're a fan of those rich, chocolatey, peanut-buttery bites like i am, you’re in for a treat! we’re diving into the essential ingredients you need to whip up some delicious homemade reese’s peanut butter cups.
Trust me, once you start making your own, you'll never want to go back!
Premium Core Components
First off, let’s talk measurements because the last thing we want is a lopsided chocolate cup! for the chocolate shell, you’ll need 1 ½ cups (250g) of semi-sweet chocolate chips.
If you want a smoother consistency, toss in 2 tablespoons (30g) of coconut oil. for that creamy peanut butter filling, grab 1 cup (250g) of creamy peanut butter, ¼ cup (30g) powdered sugar, 1 teaspoon (5ml) vanilla extract, and a pinch of salt.
That’s it, simple yet satisfying!
When selecting your ingredients, look for quality indicators – especially with your chocolate. you want it to be a rich, deep color.
As for peanut butter, natural varieties are usually best. they’ve got that wholesome, nutty flavor that really makes your cups shine!
Signature Seasoning Blend
Let’s not forget about a little flair! While the main ingredients are key, you can elevate your Reese’s inspired dessert by mixing in some flavor enhancers! Consider adding a hint of sea salt on top of your cups for that salty-sweet combo that is stick-in-your-head good!
You could also go nuts (pun intended) and throw in spices like cinnamon or a dash of espresso powder in your filling for a regional twist.
Seriously, don't be afraid to customize your peanut butter chocolate cups to make them uniquely yours!
Smart Substitutions
Sometimes, life throws you curveballs, right? maybe you’re out of peanut butter. no worries! common alternatives like almond or cashew butter work just as well.
If you need a nut-free version, sunflower seed butter is your go-to.
And let’s not forget about sweeteners! you can swap out powdered sugar for a sugar-free sweetener for low-calorie dessert recipes.
Just be sure to check the conversions—the sweetness isn’t always the same across brands.
Kitchen Equipment Essentials
Now, you’ve got your ingredients, but you also need the right tools to kick things off. here’s what i recommend: a good muffin tin or silicone molds will help you achieve those perfectly shaped cups.
Also, grab some measuring cups and a microwave-safe bowl. if you’ve got a double boiler, even better for melting chocolate without scorching!
Having the right equipment NOT only makes your life easier but saves you a ton of frustration. No one wants burnt chocolate when you so desperately want to indulge!
Conclusion
Ready to create some delicious treat variations ? the moment you bite into those magical no-bake peanut butter cups , you'll understand why this is a family favorite! and while you're munching on those heavenly snacks, keep in mind the nutrition facts of homemade treats .
For instance, each cup can clock around 150 calories . you might even recall reese's peanut butter cups calories next time you reach for one in the store.
Why not whip up healthier candy alternatives at home where you can control all the deliciousness?
So grab your ingredients, make your list, and let’s get cooking! up next, we’ll dive right into the step-by-step instructions to create your very own homemade reese’s peanut butter cups.
It’s time to make those satisfying sweet cravings come true without spending a dime at the candy store!
look into into the World of Professional Cooking
Cooking like a pro isn't just for the restaurant kitchens in new york or fancy culinary schools. you can bring that magic right into your home kitchen! let's break down a professional cooking method that’ll make your dishes shine, kinda like those reese's peanut butter cups we all adore.
Seriously, who can say no to creamy peanut butter and chocolate delight?
Essential Preparation Steps
Before you even think about turning on that stove, let's chat mise en place . it’s not just a fancy french term; it’s about getting organized.
Picture this: you've got all your ingredients measured and ready to go. you’ll feel like a superhero whipping up magic in the kitchen!
Time management tips: keep an eye on your watch. cooking is all about timing. for instance, if you're making those homemade peanut butter chocolate cups , know when to chill your chocolate and fill with that creamy goodness.
Proper organization can save your sanity.
And hey, don’t forget about safety! Keep your workspace clean. Don't place raw meat near your peanut butter. Gross, right?
Step-by-Step Process
Alright, let’s get into the nitty-gritty with some step-by-step instructions .
-
Prep your molds : Grab that muffin tin or silicone mold and line it with parchment paper if you're feeling fancy.
-
Melt your chocolate : combine 1 ½ cups of semi-sweet chocolate chips with 2 tablespoons of coconut oil in a microwave-safe bowl.
Heat in 30-second intervals , stirring in between until it's silky and smooth.
-
Scooping the chocolate : Spoon some of that luscious melted chocolate into each mold. Spread it like you’re painting a masterpiece... on a cupcake.
-
Chill to set : Pop those molds in the freezer for about 10 minutes or until the chocolate is all firm.
-
Make the filling : While it’s chilling, mix together 1 cup of creamy peanut butter , ¼ cup of powdered sugar , and a touch of vanilla. Get it nice and smooth!
-
Fill the cups : Take the molds out and spoon in your filling, leaving about ¼ inch from the top .
-
Seal it up : Pour more melted chocolate over the peanut butter. Smooth is key here.
-
Final chill : Back to the freezer for around 15- 20 minutes until they’re solid.
-
Enjoy the fruits of your labor : Carefully pop them out and get ready to impress!
Expert Techniques
Now, if you want to take it to the next level, let’s talk about some expert techniques.
Tempering chocolate doesn’t have to be a nightmare. heat gently, and don’t overdo it; we want that shiny finish. one check-point? ensure your chocolate’s around 90° f ( 32° c) for the perfect snap.
Got a hiccup? maybe the chocolate seized? just add a bit more fat (like coconut oil), and it’ll come back to life like a phoenix! perfect for those gooey, homemade peanut butter cups.
Success Strategies
And let’s not gloss over common mistakes! One huge tip? Don’t rush the chilling time. You might be tempted to dig in, but give those puppies a proper wait.
Quality assurance is key! taste as you go – no shame in that game. want to make ahead? these gluten-free peanut butter cups can chill in the fridge for about one week .
Whether it’s a birthday or a simple evening on the couch, these Reese’s inspired desserts will deliver.
In the end, there’s nothing like making your own sweets. you control the ingredients—no added sugars or hidden calories; a guilt-free way to satisfy your sweet cravings! curious about the nutrition facts of homemade treats? each cup has around 150 calories , perfect for a quick indulgence.
So what’s next in our sweet culinary adventure? Stay tuned for the Additional Information section, where we’ll chat more about dessert preparation tips and modern twists on traditional favorites! Let's keep the cooking energy flowing!
Pro Tips & Secrets for Perfect Peanut Butter Cups
When it comes to making your own homemade peanut butter cups , there are definitely some pro tips and secrets you’ll want to keep in mind.
Chef's Insight: Patience is Key
First off, tempering chocolate can be a bit tricky. if you’ve ever wondered why your chocolate looks dull or has that weird chalky finish, it’s probably because it wasn’t tempered properly.
Take your time! heat it slowly in those 30-second intervals , stirring well. you want that smooth, shiny finish—just like the ones you grab at the store!
Time-Saving Techniques
Do you want to skip some hassle? try using a microwave instead of a double boiler. yes, i said it! just make sure to keep an eye on it so it doesn't burn.
And when chilling the molds, pop them in the freezer instead of the fridge for a quick set. it’s a total game changer!
Flavor Enhancement Tips
While the classic peanut butter and chocolate combo is unbeatable, don’t be shy! add a splash of vanilla or even some sea salt to your creamy peanut butter filling .
Want to spice things up? toss in some crushed pretzels or a dollop of caramel for a delightful crunch! you’ll end up with chocolate peanut butter treats that are anything but basic.
Presentation Advice
Now, let’s talk presentation . you could simply take these beauties out of the molds and call it a day, but let's make ‘em instagram-ready! when you’re plating, think about color combinations .
A sprinkle of crushed nuts or colorful edible flowers can really elevate your dessert. it’s all about that visual appeal !
Perfect Presentation: Make Them Pop!
Want to impress the crew or serve these at your next gathering? Here’s how to make them stand out!
Simple Plating Techniques
Use a nice white plate to really make those peanut butter chocolate cups pop. lay them out in a circle or stack a few with a drizzle of melted chocolate on top.
It might sound fancy, but honestly, it’s super easy.
Garnish Ideas
Don’t forget about garnishing! a sprinkle of cocoa powder or a few chocolate shavings can add that little wow factor.
And if you want to be extra, drizzle some homemade chocolate shell over the top!
Color Combinations and Visual Appeal
Mix in some fruit like strawberries or banana slices on the side for a pop of color. it not only looks gorgeous but turns your diy candy recipes into a full-on dessert experience.
Storage & Make-Ahead Tips
Now, if you want to prepare these treasures ahead of time (and who wouldn’t?), here’s how to store them:
Storage Guidelines
Pop those lovely cups in an airtight container. you want to keep them in the fridge to maintain that smooth consistency for up to two weeks .
If there are any chances you have leftovers, which we know never happens, cart them off to your friends.
Reheating Instructions
Need to enjoy one after a week? no problem! just pull it out and let it sit at room temperature for a few minutes.
These beauties don't need heating—trust me, they'll be just fine!
Creative Variations: Switch It Up!
Feeling adventurous? Here are some creative variations to twist up your recipe:
Flavor Adaptations and Dietary Modifications
Try swapping out peanut butter for almond or cashew butter. Go for a gluten-free version using gluten-free graham cracker crumbs in the filling! You’ll never run out of options.
Seasonal Twists
When fall rolls around, why not mix in some pumpkin spice? and in summer, lighten it with some tropical flavors like coconut.
Whatever the season, there’s sure to be a healthier candy alternative that suits your vibe.
Complete Nutrition Guide: Know What's in It
Wondering about those Reese's peanut butter cups calories ? Here’s the breakdown:
Health Benefits and Portion Guidance
While these cups are a tad indulgent at around 150 calories each, they’ve got that protein from the peanut butter, keeping you satisfied without guilt.
Just be mindful of portion sizes—after all, we want to keep those sweet cravings in check!
Expert FAQ Solutions
You’ve made it this far, and you might have some burning questions.
Common Questions & Troubleshooting
- What if my chocolate won’t melt? More heat in smaller bursts will usually help.
- Can I use crunchy peanut butter? Absolutely! It’ll add an amazing texture.
Success Tips
Don’t rush the chilling times. It’s easy to get impatient, but trust me—those extra few minutes lead to the dreamiest no-bake peanut butter cups !
End on a High Note
So there you have it! whether you’re making these as a family-friendly recipe for the kids or just treating yourself after a long day, these peanut butter chocolate treats can bring a smile.
They’re easy, fun, and oh-so-delicious. get out there, whip up a batch, and share them with your squad. you got this!
Decadent Homemade Reese’s Peanut Butter Cups Card
⚖️ Ingredients:
- 1 ½ cups (250g) semi-sweet chocolate chips
- 2 tablespoons (30g) coconut oil (optional, for smoother consistency)
- 1 cup (250g) creamy peanut butter (preferably natural)
- ¼ cup (30g) powdered sugar
- 1 teaspoon (5ml) vanilla extract
- ¼ teaspoon (1g) salt
🥄 Instructions:
- Step 1: Line a muffin tin or silicone molds with parchment paper if desired.
- Step 2: In a microwave-safe bowl, combine chocolate chips and coconut oil. Heat in 30-second intervals, stirring in between, until melted and smooth.
- Step 3: Spoon a small amount of melted chocolate into each mold, spreading it evenly across the bottom and up the sides.
- Step 4: Place the molds in the freezer for about 10 minutes or until set.
- Step 5: In a bowl, mix together peanut butter, powdered sugar, vanilla extract, and salt until well combined.
- Step 6: Remove the molds from the freezer and spoon the peanut butter mixture into each chocolate shell, filling them about ¾ full.
- Step 7: Top each filled cup with remaining melted chocolate, smoothing the surface.
- Step 8: Return the molds to the freezer for another 15-20 minutes or until completely set.
- Step 9: Once set, carefully remove the cups from the molds and enjoy!
Previous Recipe: Your Ultimate 3 Ingredient Peanut Butter Fudge: A Sweet Nostalgia Trip!
Next Recipe: How to Make Homemade Pear Butter: A Delicious Fall Spread