Creamy Walnut Butter Recipe
Wondering how to whip up walnut butter? This creamy, nutty delight is easy to make at home. Try my tips for the best flavor and texture!

- Discovering Walnut Butter: The Hidden Gem of Spreads!
- What You Need to Know About Walnut Butter
- Your Essential Ingredients Guide to Cooking with Walnuts
- Mastering Professional Cooking: Your Guide to Walnut Butter Magic
- Pro Tips & Secrets for Making Delicious Walnut Butter
- Perfect Presentation
- Storage & Make-Ahead
- Creative Variations
- Complete Nutrition Guide
- Expert FAQ Solutions
- Wrap It All Up
- Recipe Card
Discovering Walnut Butter: The Hidden Gem of Spreads!
Oh my gosh! have you ever had one of those moments in the kitchen where you try something new and instantly fall in love? well, that's how i felt when i stumbled upon walnut butter .
Picture this: i was just hanging out on a lazy saturday, scrolling through pinterest, when i saw a recipe that made my mouth water.
I had some walnuts sitting there on my counter, and i thought, “why not give it a whirl?” spoiler alert: it was a nutty delight!
Creating a homemade walnut spread is super simple. with just a handful of ingredients, you can whip up a creamy, nutritious treat that not only tastes amazing but also packs a punch of flavor and health benefits.
Seriously, whether you’re spreading it on toast or dolloping it on a yogurt bowl, this nut butter recipe is a game-changer.
What You Need to Know About Walnut Butter
Let’s get into a bit of history, shall we? walnuts have been around for centuries. while they’re often overshadowed by more popular nuts like peanuts and almonds, they’re actually a treasure trove of nutrients.
In modern times, people are waking up to their versatility, using them in everything from salads to desserts. you might notice walnut butter popping up in health food stores, but i promise, making it at home is just as easy – not to mention cheaper!
Now, when you think about time, you're looking at a quick 20 minutes from start to finish. yep! that’s just 10 minutes of active prep and 10 minutes of toasting those toasted walnuts until they’re all warm and fragrant.
And for the cost? just a small investment for a cup of walnut butter that’s way healthier than most store-bought spreads.
In fact, you’re gonna love how many servings you can get from one batch!
Why You’ll Love Walnut Butter
Okay, so let’s talk about the health benefits for a sec. walnut butter is a great source of healthy fats, especially omega-3s, which are amazing for heart health.
Also, it's a fabulous option for everyone, whether you're looking for dairy-free spreads or going full vegan . plus, it's gluten-free! yup, you can enjoy this delightful treat guilt-free.
One of the coolest things about walnut butter is its unique flavor. it’s rich and creamy, with just the right amount of sweetness, especially if you go for a little drizzle of honey or maple syrup.
You can add it to many healthy spread recipes or even use it as a base for dessert spreads . seriously, top your oatmeal with it, spread it on whole grain toast, or mix it into yogurt.
Your taste buds won’t know what hit 'em!
And let's not forget about special occasions! imagine serving this during brunch with friends or as a delightful dip for apples at a kids’ picnic – it’s a hit every time.
Plus, you can easily customize it with a bit of cinnamon for warmth, or even some cocoa for a chocolatey twist.
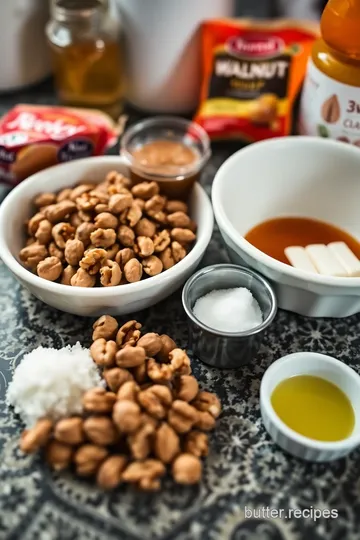
Get Ready to Gather Some Ingredients!
So, are you ready to dive into creating your own creamy walnut butter at home? you only need a few simple ingredients like raw walnuts, a pinch of salt, and optional flavorings like honey and vanilla.
Trust me – you’ll be shocked at how great your very own nutritious snack can taste!
And hey, if you’ve tried other nut butters, you can totally play around with walnut butter variations. Try subbing in pecans or almonds if you’re feeling adventurous. The kitchen is your playground!
Alright, grab your apron, and let’s get ready to blend those walnuts into creamy perfection! The journey to a delicious DIY nut butter is just around the corner. Let’s go!
Your Essential Ingredients Guide to Cooking with Walnuts
Alright, my fellow food lovers! let's dive into the essentials of cooking, especially when it comes to our star ingredient today: walnuts .
Seriously, have you tried making walnut butter at home? it's a game-changer! picture this: a creamy, nutty spread that’s perfect on toast or as a dip for fruits.
Yum!
Premium Core Components You Need
First things first, let’s talk about quality ingredients and how to store 'em to keep them fresh as possible. When you’re whipping up your signature walnut spread , the last thing you want is stale nuts, am I right?
Measurements are key, folks! for those of you measuring out ingredients in the u.s., grab 2 cups of raw walnuts (that's about 240 grams if you’re on the metric side).
If you want to treat your taste buds, don’t skimp on the salt! just 1/4 teaspoon of fine sea salt (around 1.
5g) works wonders.
Quality indicators also matter. When buying walnuts, look for ones that are plump, nice-looking, and have a fresh smell. If they smell stale or musty, put 'em back on the shelf.
Signature Seasoning Blend
Now, onto the signature seasoning blend ! mixing up flavors can elevate your homemade walnut spread to gourmet status. for instance, you can add 1-2 tablespoons of honey or maple syrup (that’s about 15-30ml) if you're feeling sweet.
Trust me, a little bit of vanilla extract goes a long way too! just 1-2 teaspoons will do the trick.
Feel adventurous? throw in a pinch of cinnamon for a warm, cozy spice.
Smart Substitutions for Everyone
We all know life gets hectic, and sometimes you don’t have everything on hand. no worries, i’ve got your back with some smart substitutions ! if you run out of walnuts—yeah, it happens—pecans or almonds are totally viable alternatives.
Thinking about dietary restrictions? You can go with maple syrup for a vegan option or replace that with agave nectar if honey ain’t your thing. So many choices, right?
Kitchen Equipment Essentials
Let’s not forget your kitchen equipment essentials ! you don’t need any fancy gadgets to make this walnut butter; keep it simple.
A baking sheet for toasting, an oven or toaster oven, and a food processor are your best friends here. trust me, you could probably call it a day with just those tools.
But if you want that extra creamy texture, a high-speed blender can work wonders too.
And, of course, you’ll want a good airtight container to store your walnut butter. Believe me, it’s gonna be too tastyy not to have some leftovers!
Love That Nut Butter!
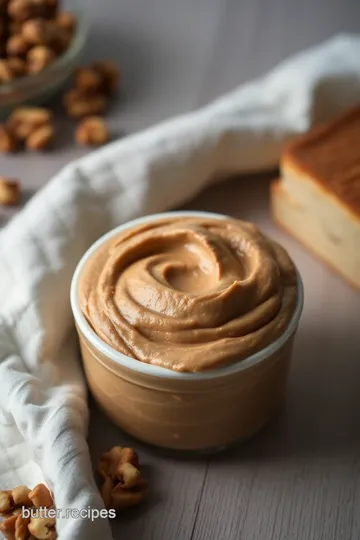
Alright, let’s get rolling with this easy nut butter recipe ! i have to tell you, the first time i made homemade walnut butter , i worried it would turn out clumpy.
But it was a kitchen victory—the creamy texture hits just right, especially with toasted walnuts!
To make it even smoother, just remember to stop and scrape down the sides of your food processor. mixing it more is the key to that dreamy, spreadable texture.
If it feels a bit too thick, a drizzle of neutral oil can help you out.
Wrapping It Up!
There you have it, friends! a complete guide to tackle your walnut butter adventure, from ingredients and seasonings to essential tools! as you jump into whipping up that dilicious walnut butter, remember those nut butter health benefits —you’re in for a treat that's both tasty and nutritious.
Next up, we’ll walk through the instructions for this luscious spread! Get ready for some DIY magic in your kitchen—your morning toast will thank you!
Mastering Professional Cooking: Your Guide to Walnut Butter Magic
Let’s talk about how to elevate your home cooking skills with a method that's simple, satisfying, and downright useful: the art of making walnut butter ! seriously, it’s one of those easy nut butter recipes you need in your life, and i’m here for it.
Making your own creamy walnut butter is a fantastic way to enjoy a nutritious snack that’s packed with healthy fats.
So, grab those toasted walnuts, and let’s dive in!
Essential Preparation Steps
First things first, let’s get our kitchen in order! anyone who’s attempted a recipe knows that a little prep goes a long way.
This is where mise en place comes into play. it’s a fancy term for having all your ingredients measured out and ready to go.
For walnut butter, you’ll need 2 cups of raw walnuts , a pinch of sea salt , and if you like a touch of sweetness, throw in some honey or maple syrup.
Time management tips? you want to be in and out of the kitchen without losing your mind. start with toasting the walnuts—this takes only about 8- 10 minutes in a preheated oven at 350° f ( 175° c) .
That’s just enough time to clean up and set up your food processor.
Organization strategies involve finding the perfect spot for everything. keep your baking sheet close to the oven and your food processor nearby.
And safety? oh, i can’t stress this enough. watch your hands, especially when dealing with a hot baking sheet. and don’t forget to let those bad boys cool down for a few minutes!
Step-by-Step Process
-
Toast the Walnuts: Lay out those walnuts on your baking sheet. Remember, stir halfway to ensure even toasting.
-
Cool the Walnuts: Once they turn golden and delicious-smelling, let them cool for about 2- 5 minutes .
-
Blend Away: Toss those cooled walnuts into your food processor. Blend on high and be sure to pause and scrape down the sides. This is key for a smooth texture!
-
Flavor It Up: Once you hit that creamy consistency, sprinkle in the salt , and add your sweetener and vanilla if desired. Give it another whirl until everything is well combined.
-
Store It: Transfer the tasty mixture into an airtight container and keep it in the fridge for up to two weeks .
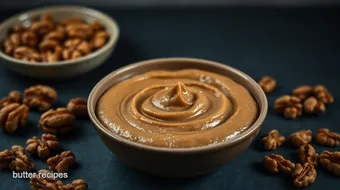
Expert Techniques
Now, if you want to get all pro-level with your walnut butter, try these critical steps. first off, toasting longer adds a deeper flavor, but watch it so it doesn’t burn! if your processor is having a tough time, let the mixture rest a bit and then blend again.
For a super smooth walnut spread , consider adding a dash of neutral oil. trust me; it can make a huge difference!
Now let’s talk about those all-important quality checkpoints . look for a nice, creamy texture without any chunks. you want it pure enough for a vegan breakfast idea like spreading it on whole grain toast with banana slices.
Speaking of quality, always do a taste test—don’t shy away from adjusting your sweetness!
Success Strategies
Alright, let’s avoid those all-too-common pitfalls. one big mistake? not letting those walnuts cool enough before blending. this can turn your nut butter into a chunky mess rather than the creamy delight we’re aiming for.
Think ahead with some make-ahead options . double the recipe and store your extra walnut butter for quick breakfasts or midday snacks.
It plays well with fruits or in oatmeal. plus, it’s a great way to sneak in some of those walnut butter nutritional benefits into your family's diet.
Be sure to check on your nut butter health benefits ! Walnuts are rich in Omega-3 fatty acids and make a fabulous addition to your diet.
In closing, there’s something so satisfying about creating your own homemade walnut spread . not only is it delicious, but it’s also a healthier option than store-bought spreads that often have added sugars or preservatives.
Stay tuned for our next section— Additional Information —where we’ll take a deeper dive into all things walnut butter! Trust me, you won’t want to miss it!
Pro Tips & Secrets for Making Delicious Walnut Butter
Let’s chat about some pro tips that’ll make you a walnut butter wizard. honestly, making your own walnut spread is way simpler than you think, and it can save you some dough on store-bought nut butters.
First off, toast those walnuts . i can't stress enough how much flavor they gain when they’re toasted! just preheat the oven to 350° f (that’s about the same as your average pizza).
Spread out those 2 cups of raw walnuts on a baking sheet and toast them for 8- 10 minutes .
Just keep an eye on them—too long, and you’ll have charcoal instead of a nutty delight.
Now, about blending. if your food processor starts to sound like it's lifting weights, pause it and give the sides a little scrape down.
This isn’t a race—the walnuts need some love to reach that creamy consistency. if you want it even smoother, add a touch of neutral oil.
For that extra flavor punch, sprinkle a bit of sea salt in there. or you can go wild with some maple syrup or a touch of vanilla extract.
I promise you won’t regret it!
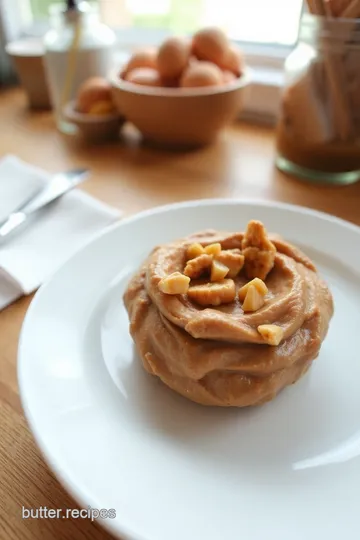
Perfect Presentation
Alright, let’s make your walnut butter pretty! plating can make a big difference in how your food feels to eat.
Spread your creamy walnut butter on a slice of whole grain toast (bonus points for lookin’ healthy, right?), then throw on some banana slices or fresh berries for that pop of color.
You can even drizzle a little honey or maple syrup on top to elevate that visual appeal. think about contrasting colors— golden walnuts , deep brown toast , and fresh colorful fruits work great together.
It’s not just about taste; it’s about that instagrammable moment too!
Storage & Make-Ahead
Now, if you’re like me, you want your homemade treats to stay fresh as long as possible. store your walnut butter in an airtight container —it’ll last in the fridge for up to two weeks .
Not bad, right?
If you want to get a little fancy, jars can also be a cute gifting idea! just don’t forget to label them, unless you want your friends guessing about whether they’re getting walnut butter or something else.
Reheating isn’t really necessary, but if you find it a bit too thick after chilling, just let it sit at room temp for a few minutes.
It’s like letting it chill out before the big show.
Creative Variations
Let’s get creative, shall we? Walnut butter is a base for endless possibilities! Try adding some cinnamon for a cozy vibe or chocolate powder for a sweet treat—who doesn’t love dessert spreads?
If you're sticking to the vegan scene, swapping honey for agave syrup works a treat. feeling adventurous? merge your homemade walnut spread with herby flavors—just toss some fresh rosemary or basil in there for a savory twist.
Your taste buds will go wild!
Complete Nutrition Guide
We all love a little health talk! walnut butter is not just delicious; it packs some serious nutrition punches. each tablespoon has about 95 calories but is loaded with healthy fats and proteins.
That’s right, folks. that nut butter wouldn’t just spread joy; it also provides energy and is an excellent source of nutrients.
Looking to keep the sugar down? go for a low sugar nut butter version without all the sweeteners. and if you’re counting carbs, this walnut butter is a gluten-free spread you can feel good about.
Expert FAQ Solutions
You might have some burning questions, and i’ve got your back. a common issue is graininess . if your walnut butter isn't as smooth as you'd like, simply blend it longer.
No such thing as over-blending when it’s that good!
And what if you've run out of walnuts? Don't fret! You can use pecans or even almonds instead. They’ll give you a unique twist while keeping things nutty and fantastic.
Wrap It All Up
So, there you have it. making your own walnut butter is an absolute game-changer, not just for you but for all those around you.
You’ll find it’s not just about enjoying a scrumptious nutritious snack ; it’s the joy of creating something healthy! give it a whirl! once you see how easy it is, i bet you’ll want to try out even more nut butter recipes .
Let me know your favorite twists! you got this, friend!
Creamy Walnut Butter Recipe Card
⚖️ Ingredients:
- 2 cups raw walnuts (240g)
- 1/4 teaspoon fine sea salt (1.5g)
- 1-2 tablespoons honey or maple syrup (15-30ml) - Optional
- 1-2 teaspoons vanilla extract (5-10ml) - Optional
🥄 Instructions:
- Step 1: Preheat the oven to 350°F (175°C) and spread walnuts evenly on a baking sheet.
- Step 2: Toast walnuts for 8-10 minutes, stirring halfway, until golden and fragrant.
- Step 3: Remove from the oven and let them cool for a few minutes.
- Step 4: Transfer cooled walnuts to a food processor and blend on high, scraping down the sides as needed.
- Step 5: When a creamy consistency is reached, add salt, honey or syrup, and vanilla, then blend until fully incorporated.
- Step 6: Transfer the walnut butter to an airtight container and store in the refrigerator for up to 2 weeks.
Previous Recipe: How to Create Herbal Bliss: Infused Oil with the Magic Butter Machine
Next Recipe: Easy Peanut Butter Protein Powder Bites: 5 Delicious Snack Secrets