Buttermilk Crepes Recipe
Enjoy Buttermilk Crepes in just 30 minutes! This quick and easy recipe features buttermilk as the main ingredient. Perfect for breakfast or brunch.

- About Introduction
- Buttermilk Crepes: A Culinary Journey
- Your New Favorite Buttermilk Crepe Recipe
- Health & Nutrition Highlights
- Recipe at a Glance
- Master Ingredient List
- Kitchen Equipment Essentials
- Pro Ingredient Tips
- Foolproof Cooking Steps
- Professional Secrets
- Perfect Presentation
- Storage & Make-Ahead
- Creative Variations
- Expert FAQ Solutions
- Recipe Card
About Introduction
Buttermilk crepes, a delightful blend of simplicity and elegance, have a rich historical background that traces back to France. These thin pancakes were traditionally crafted from basic ingredients like flour, eggs, and milk. The introduction of buttermilk adds a unique tanginess that elevates their flavor profile. Over the years, crepes have transcended borders, emerging as a favorite in various cuisines around the globe. Their versatility allows them to be filled with savory or sweet delights, making them suitable for any meal of the day.
The unique selling points of buttermilk crepes lie in their light texture and adaptability. They can be enjoyed with fresh fruits for breakfast or stuffed with cheese and vegetables for dinner. The ease of preparation makes these crepes an excellent choice for both novice cooks and seasoned chefs looking to impress guests without extensive effort.
Buttermilk Crepes: A Culinary Journey
Delving into the culinary heritage of buttermilk crepes reveals their fascinating origin story rooted in French gastronomy. Initially seen as street food in Parisian markets, they quickly gained popularity due to their deliciousness and portability. Over time, various cultures adopted this delightful dish, each adding its twist while maintaining its core essence.
Culturally significant across many nations today, buttermilk crepes symbolize celebration and community gatherings. Whether served at family brunches or festive occasions like Mardi Gras in France, they bring people together through shared flavors and experiences. In modern-day cuisine, these delectable creations are celebrated not only for their taste but also for their presentation on gourmet plates worldwide.
Your New Favorite Buttermilk Crepe Recipe
What sets apart your new favorite buttermilk crepe recipe is its unique flavor combinations that excite the palate! From luscious chocolate hazelnut spreads to zesty lemon curd paired with whipped cream—there’s no limit to creativity when filling these delicate wraps.
Foolproof techniques make this recipe approachable even for beginners! With just a few simple steps—mixing batter, cooking on a skillet—you’ll achieve perfect results every time. This method has been expert-tested by home cooks who appreciate how easy it is while still delivering restaurant-quality dishes at home.
To save time during busy mornings or last-minute get-togethers, batch-cooking these versatile treats is efficient! Cooked crepes can be stored easily in the refrigerator or freezer until needed; simply warm them up before serving!
Health & Nutrition Highlights
When considering health benefits associated with buttermilk crepes—the key nutritional highlights are impressive! Buttermilk provides calcium essential for bone health while also offering probiotics beneficial for gut health support.
Dietary considerations make this recipe adaptable; you can substitute gluten-free flour if needed without sacrificing taste or texture! Additionally—and importantly—these light pancakes can fit well into balanced diets when paired wisely with nutritious fillings such as fruits or vegetables.
Wellness advantages abound since they allow individuals flexibility concerning portion control whether indulging slightly more during weekends versus lighter meals throughout weekdays—maintaining balanced nutrition facts effortlessly!
Recipe at a Glance
Here's what you need to know about preparing your delicious batch of buttermilk crepes:
- Total Preparation Time : Approximately 1 hour (including resting time)
- Skill Level Required : Beginner-friendly
- Serving Size Details : Makes about 8–10 servings (depending on size)
- Cost Efficiency : Affordable ingredients ensure great value per serving
With all these aspects combined—from cultural significance through easy preparation methods—there's no doubt why everyone will love savoring homemade buttermilk crepe recipes regularly! Embrace creativity within traditional boundaries today!
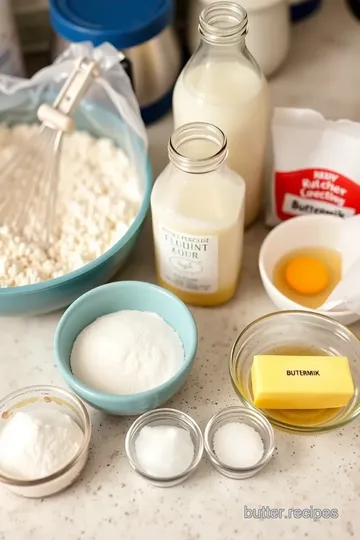
Master Ingredient List
Premium Core Ingredients
-
All-Purpose Flour (1 cup)
Use high-quality all-purpose flour for the best texture in your crepes. Look for flour with a protein content of around 10–12%. Store it in an airtight container in a cool, dry place to maintain freshness. -
Eggs (2 large)
Fresh, organic eggs are ideal for creating rich and flavorful crepes. Check for cracks before purchasing and store them in the refrigerator. They should be used within three weeks of their purchase date. -
Buttermilk (1 ½ cups)
Opt for real buttermilk rather than powdered substitutes for authentic flavor. It should be thick and slightly tangy. Keep it refrigerated and use within two weeks after opening. -
Melted Butter (2 tablespoons + extra for cooking)
Choose unsalted butter to control the saltiness of your recipe. Melt it gently to avoid burning, then let it cool slightly before adding to your batter. Store any unused butter wrapped tightly in its package in the fridge or freezer. -
Granulated Sugar (1 tablespoon, optional)
If you prefer sweet crepes, use fine granulated sugar. For healthier alternatives, consider coconut sugar or honey as substitutes during baking sessions. Keep sugar stored away from moisture. -
Salt (½ teaspoon)
Use kosher salt or sea salt for better flavor distribution compared to table salt. Store it in a dry place away from humidity.
Signature Seasoning Blend
Creating delicious buttermilk crepes can be enhanced by using a few key spices and herbs:
-
Vanilla Extract
Adding one teaspoon of pure vanilla extract will elevate the sweetness without overwhelming flavors. -
Cinnamon
Sprinkle half a teaspoon of ground cinnamon into your batter if you're looking to add warmth and depth; perfect when paired with sweet fillings like fruits or chocolate. -
Zest from Citrus Fruits
A little lemon or orange zest can brighten up your crepe's flavor profile significantly—just half a teaspoon will do wonders!
Smart Substitutions
Sometimes you may need alternatives based on dietary restrictions or ingredient availability:
-
Gluten-Free Flour : Substitute all-purpose flour with gluten-free blends containing rice flour or almond meal if you are avoiding gluten altogether.
-
Dairy-Free Options : Replace buttermilk with almond milk mixed with one tablespoon of vinegar per cup as an effective dairy substitute while maintaining similar acidity levels.
-
Egg Replacement : To make egg-free crepes, mix one tablespoon ground flaxseed soaked in three tablespoons water per egg needed; allow this mixture to sit until thickened.
These substitutions ensure that everyone can enjoy delicious crepes tailored to their dietary needs!
Kitchen Equipment Essentials
To prepare these delectable buttermilk crepes efficiently, having the right tools is crucial:
Must-Have Tools
- Mixing Bowl: A medium-sized bowl is perfect for mixing ingredients thoroughly.
- Whisk/Electric Mixer: Either tool helps combine ingredients smoothly without lumps.
- Non-Stick Skillet/Crepes Pan: Essential for easy flipping while preventing sticking.
- Ladle/Measuring Cup: Helps portion out consistent amounts of batter each time.
- Spatula: A flexible spatula makes flipping easier and more precise.
Recommended Appliances
Consider investing in:
- Crepe Maker: This appliance ensures even temperature across your cooking surface.
- Food Processor: Speeds up mixing ingredients smoothly without manual labor.
Helpful Gadgets
Tools such as silicone brushes help spread melted butter evenly across pans while ensuring minimal waste during preparation!
Home Alternatives
If you don’t have specialized equipment like a non-stick skillet handy: Use any flat frying pan instead! Just ensure it's well-coated with oil/butter before pouring batter.
Pro Ingredient Tips
Make sure you're getting top-notch results by following these pro tips:
Selection Secrets
Look closely at expiration dates on dairy products like buttermilk; fresher items yield better taste quality overall! When buying eggs, choose those labeled “cage-free” which indicate higher nutrition standards often equating better flavor too!
Quality Markers
For flours—optically inspect bags’ contents seeking uniformity rather than clumps indicating age-related degradation over time! Freshness translates directly into successful end results every single time!
Storage Solutions
Store leftovers properly by layering unfilled cooked pancakes between parchment paper sheets inside sealed containers—this keeps them fresh longer while minimizing spoilage risk significantly due mainly because air exposure diminishes viability rapidly over short periods otherwise experienced normally!
By being mindful about choosing premium core ingredients alongside supplementary seasonings & useful kitchen tools—all contribute positively towards achieving delightful buttery thin-textured creations known commonly referred-to-as "Creps"!
Foolproof Cooking Steps
Essential Preparation Steps
Before you start cooking, it's important to prepare. This is called mise en place, which means "everything in its place." Gather all ingredients and tools needed for the recipe. Measure out your flour, eggs, and buttermilk beforehand. This will save time and prevent mistakes.
Next, focus on your prep techniques. For crepes, ensure that your mixing bowl is large enough to accommodate the batter without spilling. Use a whisk or an electric mixer to blend everything smoothly. Remember, letting the batter rest for 30 minutes helps create tender crepes.
Time management is key when cooking. Set a timer for each step; this helps keep you on track. While waiting for the batter to rest, heat up your skillet so it’s ready when you are.
Stay organized by keeping your workspace tidy. Clean up as you go along instead of leaving everything until the end. This makes cooking more enjoyable and efficient.
Professional Cooking Method
Now let's dive into the cooking process itself! Start by heating a non-stick skillet over medium heat for about 2 minutes before adding butter to coat it lightly.
Pour about ¼ cup of batter into the center of the hot skillet once it’s ready. Quickly swirl it around to spread evenly across the bottom; this should take no more than 10 seconds.
Cook each crepe for about 1–2 minutes or until you see edges lifting slightly and turning golden brown—a good indicator that it's time to flip!
Carefully turn over with a spatula and cook an additional 30 seconds on this side—watching closely as timing is crucial here!
Repeat these steps until all batter has been used up, making sure to reapply butter in between batches if necessary.
Expert Techniques
To achieve professional-level crepes, there are some expert techniques worth noting:
First, ensure temperature control throughout cooking; too high can burn them while too low may result in soggy crepes.
Precision points matter! When pouring batter into the pan, do so gently yet quickly—this maintains even thickness across each crepe without creating lumps.
Quality checks are essential during flipping: if they stick or tear easily during this process, adjust heat downwards next time around—it may be too hot!
Success Strategies
Even experienced cooks face challenges sometimes! Here are troubleshooting tips:
If your first few crepes don’t turn out well—they might be thin or uneven—don’t worry! The first one often serves as a tester for adjusting temperature settings correctly moving forward.
For quality assurance after finishing all layers: look at texture; they should be delicate yet firm enough not fall apart easily upon filling or folding them later on!
To achieve perfect results every time with consistent flavor profiles consider experimenting with different fillings like fruits or creams based on seasonal availability—this adds variety without compromising simplicity!
Finally—the last touch—that's presentation! Use fresh garnish such as berries sprinkled atop filled sweet versions before serving alongside whipped cream drizzled artistically around plates makes any dish look gourmet instantly!
Follow these foolproof steps carefully from preparation through execution ensuring delightful homemade buttermilk crepes every single time!
Professional Secrets
Expert Techniques for Perfect Crepes
Achieving flawless buttermilk crepes requires practice and technique. Use a non-stick skillet to prevent sticking, and ensure it is properly heated before adding the batter. A quick swirl of the pan helps spread the batter evenly, creating that signature thin layer. Resting the batter for 30 minutes allows flavors to meld and improves texture.
Kitchen Wisdom for Consistency
To maintain consistent results, measure ingredients accurately. Consider using a kitchen scale for precision. If your crepes are too thick, add a little more buttermilk to achieve your desired consistency. Remember, practice makes perfect; don’t be discouraged by any initial mishaps!
Success Guarantees with Quality Ingredients
Always opt for fresh ingredients when making crepes. High-quality eggs and real buttermilk make a significant difference in flavor. Additionally, if you encounter lumps in your batter, simply strain it through a sieve before cooking.
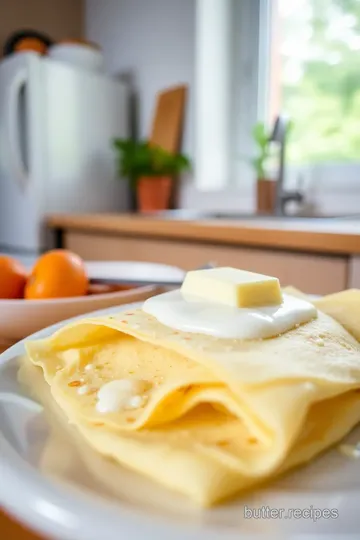
Perfect Presentation
Plating Techniques That Wow
When serving crepes, presentation matters! Stack them neatly on a plate or fold them elegantly into quarters or triangles. This not only looks appealing but also makes it easier for guests to enjoy them.
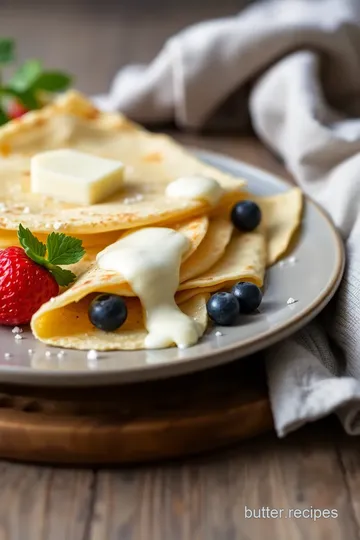
Garnish Ideas for Extra Flair
Enhance visual appeal with fresh fruits like strawberries or blueberries arranged artfully around the plate. Drizzle warm chocolate sauce or caramel over the top for an eye-catching finish that tempts taste buds.
Serving Suggestions That Delight
Serve crepes alongside whipped cream or vanilla ice cream for added indulgence. For savory options, pair with a light salad dressed in vinaigrette to balance flavors beautifully.
Visual Appeal Tips
Use colorful ingredients when possible—vibrant berry compotes or bright citrus zest can elevate both flavor and visual presentation significantly!
Storage & Make-Ahead
Storage Guidelines for Freshness
Store unfilled crepes in an airtight container lined with parchment paper between layers to prevent sticking. They can be refrigerated for up to three days without losing quality.
Preservation Methods That Work
For longer storage times, consider freezing cooked crepes following proper layering techniques mentioned above. They can last up to two months frozen while still tasting fresh upon reheating.
Reheating Instructions Made Easy
To reheat refrigerated crepes quickly, use a microwave on low power until warmed through—about 15-30 seconds per piece works well! For frozen ones, thaw overnight in the fridge before reheating as desired.
Freshness Tips You’ll Love
Avoid letting prepared ingredients sit out too long at room temperature; keep everything chilled until ready to assemble!
Creative Variations
Flavor Adaptations That Excite
Don’t hesitate to experiment with different flours like buckwheat or almond flour for unique tastes! Adding herbs such as dill or basil enhances savory fillings tremendously while keeping things interesting.
Dietary Modifications For Everyone
Make gluten-free versions of these delightful treats by substituting all-purpose flour with gluten-free blends available at most grocery stores today!
Seasonal Twists To Enjoy Year-Round
Incorporate seasonal fruits during their peak freshness—think pumpkin puree in fall or refreshing mango salsa during summer months—to bring life into every bite!
Regional Variations Worth Trying
Explore international influences! Try filling your crepe with classic French Ratatouille or Italian Nutella spread mixed expertly within layered delicacies worldwide!
Expert FAQ Solutions
Common Concerns Answered Quickly
Many home cooks worry about getting their first batch right; remember: patience is key!
Expert Answers Simplified
If stuck trying new fillings—for sweet variations stick primarily towards fruit-based toppings while savory combinations often shine best alongside cheeses!
Troubleshooting Guide To Save The Day
If you find your edges tearing apart while flipping—it could mean either undercooking initially causing instability OR overheating leading toward burning edge parts slightly instead of smoothing out fully onto plates nicely later on down line once plated attractively overall afterwards finally here again yet importantly now too below…
Success Tips To Boost Confidence
Confidence builds skill—embrace mistakes as learning opportunities because each attempt gets better over time—a perfect process indeed always along journey ahead from start till end ultimately throughout this lovely adventure together universally alike somehow inevitably here always proudly onward moving forward energetically onwards next step-wise truly...
(Values may vary based on specific ingredients used.)
Buttermilk Crepes Recipe Card

⚖️ Ingredients:
- 1 cup all-purpose flour
- 2 large eggs
- 1 ½ cups buttermilk
- 2 tablespoons melted butter (plus more for cooking)
- 1 tablespoon granulated sugar (optional)
- ½ teaspoon salt
🥄 Instructions:
- Step 1: [Prepare the Batter] In a mixing bowl, whisk together the flour, eggs, buttermilk, melted butter, sugar (if using), and salt until smooth. Let the batter rest for about 30 minutes at room temperature to allow the gluten to relax.
- Step 2: [Heat the Skillet] Place a non-stick skillet over medium heat and add a small amount of butter to coat the surface evenly.
- Step 3: [Cook the Crepes] Once hot, pour about \u00BC cup of batter into the center of the skillet. Quickly swirl the pan to spread the batter thinly across the bottom. Cook for about 1\u20132 minutes until edges begin to lift and turn lightly golden.
- Step 4: [Flip] Carefully lift with a spatula and flip; cook on this side for an additional 30 seconds to one minute.
- Step 5: [Repeat Cooking] Transfer cooked crepe to a plate and repeat with remaining batter, adding more butter as needed between batches.
- Step 6: [Serve] Fill your crepes with your favorite ingredients such as fresh fruits, whipped cream, Nutella, sautéed vegetables or cheese.
- Step 7: [Storage] Unfilled crepes can be stored in an airtight container in the refrigerator for up to three days or frozen with parchment paper between each layer.
Previous Recipe: Roasted Almonds with Sweet Honey Butter
Next Recipe: Bake Jif Peanut Butter Cookies in 25 Min