Butterfinger Caramel Crunch Bars
Discover the irresistible Butterfinger caramel crunch bars that are easy to make and perfect for any gathering! Try this deliciously layered dessert today!

- The Ultimate Guide to Mastering Butterfinger Caramel Crunch Bars
- Why This Recipe Will Amaze You
- Health and Nutrition Highlights
- Recipe at a Glance
- Quality Ingredients Breakdown
- Kitchen Equipment Essentials
- Professional Cooking Guide: Butterfinger Caramel Crunch Bars
- Master Chef's Advice
- Perfect Presentation
- Storage and Make-Ahead
- Creative Variations
- Complete Nutrition Guide
- Expert FAQ Solutions
- Wrapping Up
- Recipe Card
Have you ever wondered what happens when rich chocolate and gooey caramel join forces? if that tantalizing thought sparks your curiosity, then you're in for a treat with my butterfinger caramel crunch bars .
This recipe is something i stumbled upon during one of my baking escapades, and let me tell you, they have quickly become a cherished favorite in our household.
With a prep time of just 20 minutes and a cooking time of around 25 minutes, this easy recipe is perfect for bakers at any skill level.
So, whether you’re a beginner or a seasoned pro, i promise you'll find this delightful dessert straightforward and incredibly satisfying!
The allure of layered desserts isn't just modern; they have roots that reach deep into our culinary history. from the classic english trifle, which layers sponge cake, custard, and fruit, to the american favorites that pop up at potlucks, layered desserts have a special place in our hearts—especially when chocolate and caramel are involved.
The butterfinger caramel crunch bars carry a rich culinary heritage that connects you with every sweet tooth across generations.
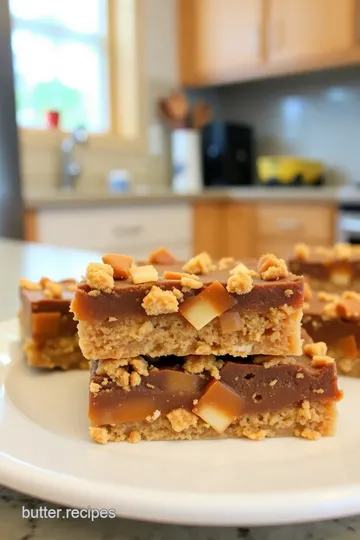
These bars are special because they beckon you with their unique combination of crispy graham cracker goodness, luscious caramel, and a crunchy topping featuring the ever-popular butterfinger candy bars.
What’s better? they’re unbelievably easy to make! you’ll impress your friends and family with a dessert that looks like it took hours in the kitchen but actually can be whipped up in no time.
The Ultimate Guide to Mastering Butterfinger Caramel Crunch Bars
If you’ve never experienced the joy of biting into a homemade sweet treat that tantalizes your taste buds and evokes nostalgia, you’re missing out.
This dessert has a fascinating origin story, influenced by classic american candy-making traditions. although butterfingers have been stealing hearts since 1923, the idea of combining it with caramel dates back to when people started to get adventurous with desserts, creating unique flavor pairings that are still sought after today.
Furthermore, these bars carry cultural significance, particularly in american homes, where chocolate and caramel combinations represent celebration and joy. they often grace tables during festive gatherings, and with their modern-day popularity soaring, these bars are now a staple at birthday parties and family barbecues across the nation.
Why This Recipe Will Amaze You
The butterfinger caramel crunch bars will leave you in awe not just because of their sweet existence but due to their unique flavor combinations .
You’ve got the sweetness of caramel dancing with the salty, peanutty crunch of butterfinger, all cushioned by a rich chocolate blanket topping.
And let me tell you, the techniques here are foolproof. if i can do it—believe me, i’ve had my fair share of kitchen disasters—you can too!
The method has been tested time and again, so you can introduce these to friends with confidence. i still remember my first batch where i accidentally burnt the chocolate.
Lesson learned: keep an eye on that microwave and stir frequently! you'll also appreciate the time-saving tips that allow you to impress without the stress.
Health and Nutrition Highlights
Now, i'm not saying these bars are the answer to all your health concerns, but they do bring a little joy into the world.
Each bar offers around 210 calories, and while they’re rich in flavor, it’s always fun to know what’s going into our snacks.
With a little bit of dietary flexibility, you can make choices that suit your needs. for instance, if you're looking to keep it gluten-free, you can easily swap in gluten-free graham cracker crumbs.
Let’s be honest: these bars provide balanced nutrition, not in the leafy greens sense, but in the context of treating yourself mindfully.
It's all about enjoying the sweetness of life, wouldn’t you agree?
Recipe at a Glance
Now, for the moment you've been waiting for! Here’s a quick overview of what to expect with these delightful Butterfinger Caramel Crunch Bars .
- Total Preparation Time : 20 minutes
- Cooking Time : 25 minutes
- Skill Level : Easy
- Serving Size : 12 bars
- Cost Efficiency : Friendly on the wallet and can readily make an impact for gatherings.
If your mouth is watering by now, don’t worry; we’ve got the next section covered. let's dive into the ingredients, which are simple yet delightful, setting the stage for some delightful baking.
Get ready to gather your supplies because these bars are about to become the star of your dessert lineup!
Quality Ingredients Breakdown
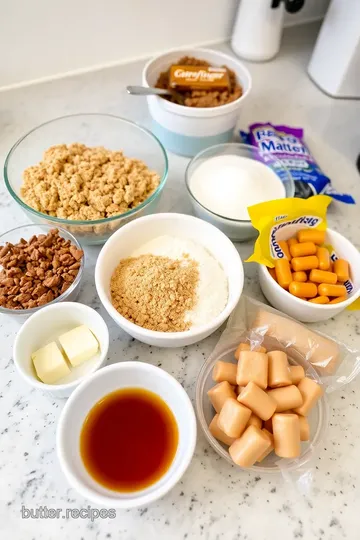
Premium Core Ingredients
When it comes to nailing the butterfinger caramel crunch bars , quality is key to achieving that mouthwatering flavor and texture that makes these bars totally irresistible.
Start with 1 ½ cups of graham cracker crumbs, which sets the foundation. i like to use the classic honey maid brand—it gives that sweet kick.
Don’t be afraid of the cocoa powder either; i go for unsweetened because it balances the sweetness of the caramel topping perfectly.
You’ll need ½ cup unsalted butter, melted, which i always keep on hand for my baking adventures. look for a really rich, golden color, as it’s a tell-tale sign of quality.
Just be sure to store any leftovers in the fridge if you don't plan on using it right away.
Signature Seasoning Blend
Now let’s talk about how to bring everything together with that signature seasoning blend. for this recipe, it's a pretty simple affair, but monumental in flavor.
A dash of vanilla extract (1 teaspoon) is all you need to elevate those sweet notes. trust me, don’t skimp on it! quality vanilla makes all the difference.
And a little tip from me? always measure out your spices before you start cooking. that way, you won’t be scrambling mid-recipe.
Smart Substitutions
Sometimes, you just don’t have the exact thing on hand, and that’s totally okay! if you've run out of graham crackers, you can easily swap in crushed digestive biscuits or even oreos for a chocolatey twist.
For those who are looking for a healthier option, trying almond or coconut flour mixed with a bit of honey can be a fun alternative, though it may change the texture slightly.
And if you’re out of heavy cream for the caramel layer, don't panic! a can of coconut cream works wonders and gives a lovely taste.
Be adventurous, i say, but predictably, if it goes wrong, don't blame me!
Kitchen Equipment Essentials
Alright, let’s make sure you have all the right gear to whip these bad boys up. first off, you’ll need a solid mixing bowl—trust me, you’ll be combining a lot of ingredients! a good 9x9-inch baking dish is essential for getting those perfect bars, and i swear by a non-stick option.
If you’ve got a paring knife for slicing, that's all you need to ensure those cuts are clean. the real star, however, is the trusty rubber spatula for spreading that caramel and chocolate on top; it keeps it neat and tidy, just like my mother always wanted my kitchen to be (but let me tell you, it's rarely ever tidy!).
Pro Ingredient Tips
As with any recipe, i’ve learned a few secrets along the way. always opt for fresh caramels—there's nothing worse than chomping down on a hard caramel layer that didn't melt.
For storage, keep your bars in an airtight container in the fridge. they can usually last for about a week, although they never last that long in my house because, let’s face it, they’re just too delicious! and a quick money-saving tip? check local grocery stores or outlets for bulk deals on chocolate and nuts; it can really help the pocketbook.
Now, after you’ve navigated through all these quality ingredients and smart substitutions, the next section is where the magic happens.
We’ll dive into the step-by-step cooking instructions so you can get to the fun part—making your very own butterfinger caramel crunch bars! you’ll be savoring that rich blend of chocolate and caramel in no time.
Get ready to impress everyone at your next gathering!
Professional Cooking Guide: Butterfinger Caramel Crunch Bars
Making butterfinger caramel crunch bars can feel like a walk in the park—until you actually start cooking and realize how fun (and a bit chaotic) it can get! i've had my fair share of flour explosions and chocolate mishaps, but after all these delicious experiments, i’m here to pass on my wisdom.
Let’s dive into the nitty-gritty of whipping up these sweet treats!
Essential Preparation Steps
Mise en place: before you even think about flipping on that oven, gather all your ingredients and tools. seriously, it saves a ton of stress later on.
Measure out your graham cracker crumbs, chocolate chips, and the delightful butterfinger pieces. if i could give you a solid tip from my kitchen adventures, it would be to always prep everything first .
Trust me, you don’t want to be scrambling for that cocoa powder while melted chocolate is threatening to ruin your countertops.
Prep techniques: for the base, you want to crush those graham crackers into fine crumbs. i usually throw them in a resealable bag and bang them down with a rolling pin.
It’s kind of therapeutic, honestly! then, melt the butter on low heat or in the microwave for a quick moment.
Just watch it! you don’t want it bubbling, or you’ll end up with a butter explosion.
Time management: plan the recipe strategically. the base needs to bake for 10-12 minutes, which gives you just enough time to prepare the caramel.
If you find yourself rushing, maybe that’s an indicator you need to embrace the slow food vibe.
Organization tips: clean as you go! i used to leave my kitchen looking like a tornado had hit it, but now i try to leave it in decent shape.
Put dirty bowls in the sink and wipe down surfaces as you work. your future self will thank you when you’re ready to devour those bars.
Professional Cooking Method
-
Prepare the base: preheat your oven to 350°f (175°c). combine graham cracker crumbs, cocoa powder, melted butter, sugar, and vanilla extract in a mixing bowl.
Get your hands dirty mixing until it resembles wet sand—it’s a sensory joy! press the mixture evenly into a greased 9x9-inch baking dish, packing it down firmly.
Bake it for about 10-12 minutes until it’s set. you’ll know it's ready when it no longer feels gooey to the touch.
-
Make the caramel layer: while your base is cooling, melt those unwrapped caramels and heavy cream together in a medium saucepan over low heat.
Keep stirring until it’s all smooth and luscious—this should take 5-7 minutes. pour this golden goo over your cooled base and let it jud elizabeth cool off for about 10 minutes while you prep the topping.
-
Prepare the topping: melt your semisweet chocolate chips in a microwave-safe bowl at 30-second intervals (give it a stir each time).
This melting process can be quite zen if you let it. once smooth, stir in those crushed butterfinger pieces, and get ready for a seriously good filling!
-
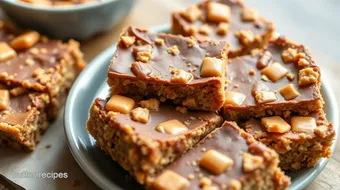
Assemble the bars: pour the chocolate-butterfinger mixture over the caramel layer, spreading it evenly. then, pop it in the fridge for at least 30 minutes so everything sets beautifully.
Just a heads up: impatience will not serve you well here!
-
Cut and serve: after it’s all set, take it out and cut into squares. if you used parchment paper, simply lift them out.
If not, gently run a knife along the edges. i love that moment when it finally cuts through all those layers—pure satisfaction!
Expert Techniques
Temperature control: get cozy with your oven thermometer! making sure your oven is at the right temperature can make all the difference.
A too-hot oven might burn your graham cracker base, while a too-cool oven will leave it soggy.
Timing precision: when working with caramel, watch your clock. if you heat it for too long, it can get way too thick.
But if it’s undercooked, it might not set right. perfection takes patience, folks!
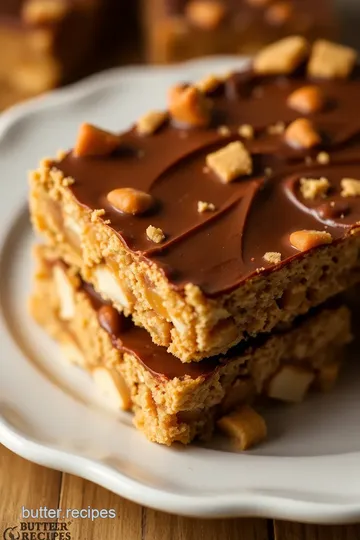
Success indicators: the chocolate topping should look smooth and glossy, while the caramel should be a soft, sticky layer underneath.
If any of your components seem off, don’t fret; just remember to adjust cooking times for next time.
Success Strategies
Troubleshooting Tips: If your chocolate isn't melting well, don’t lose hope! Add a splash of vegetable oil—it’ll fix that chocolate clumpiness right up.
Quality Assurance: Always taste as you go along—don’t underestimate the importance of quality checking! If it doesn't taste heavenly at any point, add a little more vanilla or sugar.
Perfect Results Guide: For the ultimate indulgence, let these bars chill longer in the fridge. The longer they sit, the better they meld together! Trust me; they become more irresistible each hour.
So, there you have it—a cozy and somewhat chaotic adventure in the kitchen that ends with butterfinger caramel crunch bars .
Perfect for any family gathering or just to keep at home for late-night snacks (guilty!). let’s sprinkle in some additional ideas to elevate your dessert game, shall we?
Master Chef's Advice
When it comes to whipping up my favorite butterfinger caramel crunch bars , i've learned a few tricks from the pros.
The first gem of wisdom is to always measure your ingredients accurately. i once thought i could eyeball the graham cracker crumbs and ended up with a crust that was more crumble than base—let's just say the bars were a tad messy!
For those expert techniques, don’t skip on the quality of your chocolate. use good chocolate chips, and you'll notice the taste difference right away.
You’d think it wouldn't matter much, but trust me—those little details can elevate your dessert from “meh” to “wow!”. and if you’re aiming for that gourmet finish , let the warm chocolate topping set on its own rather than sticking it back in the fridge.
This results in a better shine and texture.
Finally, here’s a piece of kitchen wisdom straight from my misadventures : when melting the caramel, always be patient. low and slow is the name of the game.
Burnt caramel is a heartbreak no one wants to experience, especially over such a delightful recipe.
Perfect Presentation
Now, let’s talk about making those butterfinger caramel crunch bars shine like stars on your dessert table. plating might seem trivial, but it matters! consider using a sharp knife to sort of shave the edges of your bars for that neat look.
You’ll be surprised by how much of a difference that can make.
Garnishing can take your bars to the next level, too. a sprinkle of crushed butterfinger on top not only adds texture but also bursts with chocolatey-peanut butter love.
Serve them on a simple white plate for a classic look, or try a colorful platter that matches the occasion.
Visually appealing treats are half the reason everyone dives in!
Storage and Make-Ahead
Want to enjoy these bars later? storing is super easy! wrap them tightly in plastic wrap or pop them in an airtight container.
Those babies can last up to a week in the fridge, but i’ll bet they'll be gone much quicker than that.
If you want to get ahead of the game, feel free to make them in advance. just ensure you let them cool completely before wrapping, so you don’t end up with a sticky mess.
For reheating, a quick 10 seconds in the microwave brings back that gooey texture.
One tip I learned? Leave some space between bars in the container. They tend to stick together, and nobody wants to fight for that last piece!
Creative Variations
You know what’s exciting? changing things up! if you want to mix the flavors, try adding a splash of sea salt on top after pouring the melted chocolate.
This sweet and salty combo is to die for!
If you have friends who can’t do gluten, swap the graham cracker crust for a gluten-free option—trust me, they won’t even notice.
To keep things seasonal, how about adding a layer of pumpkin pie spice to the caramel mix in autumn? instant fall vibes!
And yes, use different candy bars! Snickers or Twix could be a game changer here— just don’t tell your friends !
Complete Nutrition Guide
Now, let’s break it down a bit. each butterfinger caramel crunch bar has about 210 calories, making them a bit indulgent, but hey, who doesn’t love a treat now and then? the chocolate and caramel give a satisfying sweetness that’s sure to perk you up.
Plus, the graham crackers bring a bit of fiber to the mix. do keep portion size in mind; after all, it’s easy to munch down more than one!
If you're looking for a lower-sugar option, consider using a sugar substitute in the crust or just use fewer chocolate chips.
Expert FAQ Solutions
I once had a friend ask me why her caramel wouldn’t melt right. well, the answer is simple: she was in too much of a rush! caramel needs time.
If that ever happens to you, just add a touch more heavy cream to bring it back.
If you run into issues with the bars sticking to the pan, here’s a golden tip: use parchment paper. Oh, that makes life so much easier! Plus, if you’re unsure about cutting, let them sit for a minute or two to warm slightly, it’ll cut like butter!
Wrapping Up
So there you have it! a whirlwind tour of creating those irresistible butterfinger caramel crunch bars . from mastering techniques beckoned by culinary wizards to stylishly serving them up, there's no shortage of fun to be had with this recipe.
And let me tell you, your gatherings will never be the same after you’ve made these delightful bars. now grab your ingredients and let the sweet adventures begin—your sweet tooth will thank you later!
Butterfinger Caramel Crunch Bars Card
⚖️ Ingredients:
- 1 ½ cups graham cracker crumbs
- ⅓ cup unsweetened cocoa powder
- ½ cup unsalted butter, melted
- ½ cup granulated sugar
- 1 teaspoon vanilla extract
- 14 oz (1 bag) of soft caramels, unwrapped
- 2 tablespoons heavy cream
- 1 cup Butterfinger candy bars, crushed (about 4-6 bars)
- 1 cup semisweet chocolate chips
- 1 tablespoon vegetable oil (optional for shiny chocolate)
🥄 Instructions:
- Step 1: Preheat your oven to 350°F (175°C). In a mixing bowl, combine the graham cracker crumbs, cocoa powder, melted butter, sugar, and vanilla extract. Mix until well combined and the mixture resembles wet sand. Press the mixture evenly into the bottom of a greased 9x9-inch baking dish. Bake for 10-12 minutes or until set. Remove from the oven and let it cool while you prepare the caramel layer.
- Step 2: In a medium saucepan over low heat, combine the unwrapped caramels and heavy cream. Stir gently until the caramel is melted and smooth. This should take about 5-7 minutes. Pour the caramel over the cooled graham cracker base, spreading it evenly with a spatula. Allow it to cool slightly for about 10 minutes.
- Step 3: In a microwave-safe bowl, combine the semisweet chocolate chips and vegetable oil (if using). Microwave in 30-second intervals, stirring after each, until the chocolate is completely melted and smooth (about 1-2 minutes total). Stir in the crushed Butterfinger bars into the melted chocolate. Ensure the pieces are evenly coated.
- Step 4: Pour the chocolate and Butterfinger mixture over the caramel layer, spreading it evenly with a spatula. Place the dish in the refrigerator for at least 30 minutes to allow the layers to set completely.
- Step 5: Once set, lift the bars out of the dish using the edges of the parchment paper (if used) or by running a knife along the sides. Cut into 12 squares and serve.
Previous Recipe: Peanut Butter Holder NYT: 10 Creative Ways to Enjoy
Next Recipe: Butterfinger Balls Recipe: 10 Easy Steps for a Delicious Treat