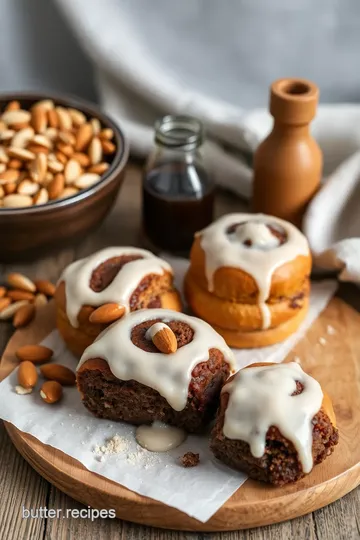
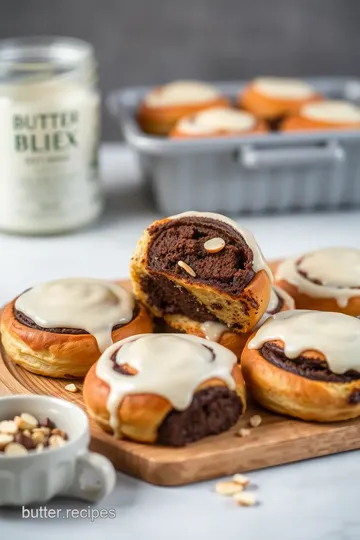
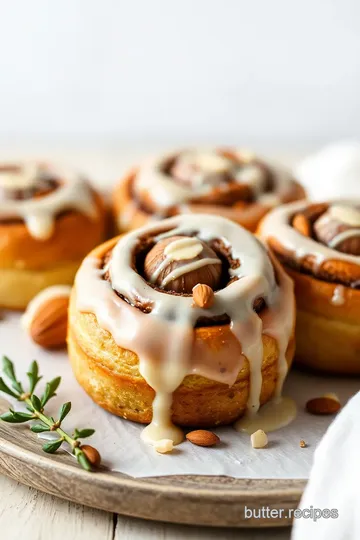
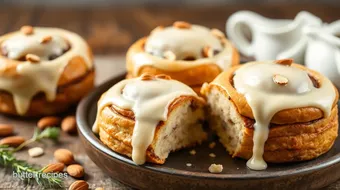
Decadent Chocolate Almond Rolls with Luxurious Vanilla Glaze
Indulge in my Bake Chocolate Almond Rolls with Vanilla Glaze! These soft rolls are a delightful treat that your family will love. Find the easy recipe inside!

- A Sweet Start to Your Day
- A Look Back: Recipe Overview
- Digging Deeper: Key Benefits
- From Ingredients to Inspiration
- Your Go-To Ingredients Guide for Baking Success
- Professional Cooking Method: Mastering the Chocolate Almond Rolls
- Cooking Secrets and Storage Tips for the Perfect Chocolate Almond Rolls
- Frequently Asked Questions
- Recipe Card
A Sweet Start to Your Day
Have you ever woken up to the smell of fresh-baked goods wafting through the house? i remember one saturday morning, craving something sweet but comforting.
So, i grabbed my apron and thought, why not bake chocolate almond rolls with vanilla glaze ? let me tell ya, it was a game-changer! these rolls are not just any ordinary breakfast pastry; they are warm, soft, and drizzled with a luxurious glaze.
Honestly, they're like a warm hug from your favorite grandmother!
You know those moments when you’re looking for a quick pick-me-up? this recipe is what i consider a sweet comfort food treat .
They’re perfect for breakfast, brunch, or even an afternoon snack. whether you are hanging out with friends or just treating yourself, these lightly sweetened rolls hit the spot.
A Look Back: Recipe Overview
Let’s dive right in! the idea of chocolate and almond coming together is not new. european pastry recipes have been playing with this flavor combination for centuries.
You can trace their roots back to traditional bakeries, where chefs perfected the dough and fillings. nowadays, these rolls are trending in cafes and bakeries across america, partly because they’re such a delicious twist on classic homemade cinnamon rolls .
Now, you’re probably wondering about how challenging this is, right? i’d say it’s got a medium difficulty level. if you’ve made sweet roll recipes before, you’re probably set.
The entire process takes about 1 hour and 15 minutes from start to finish, including a little downtime for chilling the dough.
Plus, it yields 12 glorious rolls, so it’s great for sharing—or hoarding for yourself!
And let’s chat about cost. To whip up a batch of these delights won’t break the bank. With basic pantry ingredients, you can indulge without feeling guilty.
Digging Deeper: Key Benefits
Now, let’s talk benefits! first off, these rolls are all about balance. the health benefits in almond meal add protein and healthy fats.
So, while you're indulging, you’re also sneaking in some nutritious elements. and the sweet vanilla glaze? it’s simple and oh-so-sweet, perfectly complementing the chocolate and almond flavor.
These chocolate almond rolls are great for special occasions too! birthday brunch? say less! they make for stunning tasty breakfast rolls that your friends and family will rave about.
Trust me; when you pull these beauties out of the oven, they somehow magically turn your ordinary morning into a celebration.
What sets these rolls apart from similar recipes? they combine that decadent chocolate detail with the nutty flavor of almonds, creating a delightful tension in every bite.
Unlike other rolls, which may be too sweet or incredibly dense, this one offers a fluffiness that can only be achieved through the right soft dough recipe .
From Ingredients to Inspiration
Ready to jump into the ingredients? here’s the thing—i love that you can play around with fillings. that’s the beauty of this recipe; you can customize it based on your preferences.
Recommend adding nut butter or swap chocolate chips with different types of nuts. there are endless ways to experiment with this chocolate almond snack!
Stay tuned because next, we'll dig into exactly what you'll need to create a vanilla glaze recipe that will make your rolls shine and dazzle.
Trust me; you won’t want to miss this step! who knew baking could be so easy and rewarding? let’s get rolling!
Your Go-To Ingredients Guide for Baking Success
When you’re ready to whip up some chocolate almond rolls with vanilla glaze , it’s all about the ingredients and tools you use.
It's like building a great sandwich: you need the right bread, meat, and toppings! so here’s your essential ingredients guide, broken down into bite-sized sections to help you become the baking wizard you were born to be.
Premium Core Components
Let’s kick it off with the stuff you just can’t skip. You want your rolls fluffy and delicious, right? Here are some key ingredients you need:
- All-Purpose Flour : You’ll want 3 ½ cups (440g) for that soft dough. Look for the type with high protein content for the best rise. It should feel silky to the touch.
- Sugar : Don’t go cheap! 1/4 cup (50g) granulated sugar gives you that sweet magic. If your sugar is clumpy, it might not be so fresh—toss it!
- Yeast : 1 packet (7g) of active dry yeast is crucial. Fresh yeast should smell yeasty, not musty. Always check the expiration; it’s like buying milk!
Storage tips? keep your flour and sugar in an airtight container to prevent any pesky critters from crashing your baking party.
Generally, flour stays good for about 6-12 months in the pantry; sugar can hang around even longer—up to indefinitely if dry.
Signature Seasoning Blend
Now comes the fun part— signature flavor . The right spices and herbs can make your rolls sing!
- Mix 1/2 cup (120g) chocolate chips with 1/2 cup (50g) almond meal. They’re a match made in sweet tooth heaven.
- You’ll also want 1 teaspoon almond extract in there. It takes your flavors to a whole new level. And if you’re feeling extra creative, why not toss in a pinch of cinnamon? It's a classic for a reason.
From a baking perspective, regional variations matter too. For instance, using hazelnut extract gives you that nutty Italian twist.
Smart Substitutions
Sometimes, you gotta roll with what you got! Here are the substitutes to keep in your back pocket:
- Gluten-Free Needs? Swap out regular flour for a gluten-free blend. Make sure it’s designed for baking—or else your rolls might end up like bricks.
- Dairy-Dilemma? Use coconut milk and coconut oil instead of regular milk and butter. Your rolls will still be dreamy!
- Emergency Fixes : Out of chocolate chips? Use dried fruit like raisins or cranberries —adds a nice chew!
Kitchen Equipment Essentials
Alright, before you start mixing flour and sugar, you need the right kitchen gear :
- A mixing bowl for combining ingredients. No one wants a flour explosion, right?
- A rolling pin is essential to get that dough down to a perfect thickness.
- Don’t skip a baking sheet lined with parchment paper. Trust me, it saves you from a huge mess and makes for a super easy cleanup.
Just for a safety tip: always check your equipment before using it, especially if it’s been sitting in the back of the cupboard like a forgotten relic.
Wrap-Up Before Baking Bliss
When you whip up these chocolate almond rolls with vanilla glaze , you’re not just making a treat. you’re crafting a memory.
Picture it: those lightly sweetened rolls coming out of the oven smelling divine. they’re perfect for breakfast or as a comforting afternoon snack.
Now that you have all the ingredients and tools, you’re ready for the next step: mixing, rolling, and baking your way to pastry perfection! from dough techniques to flavor magic, buckle up for an adventure in the kitchen.
Let’s get your decadent dessert ideas rolling!
Happy baking, my friends, and, as always, don’t forget to share your creations with those you love! After all, food is better when it's shared.
Professional Cooking Method: Mastering the Chocolate Almond Rolls
When it comes to baking, it’s all about that professional cooking method , right? whether you're crafting a cozy breakfast or a sweet surprise for your friends, the process can be your best buddy.
And trust me, once you dive into that world of homemade cinnamon rolls and almond pastry , you’ll never look back.
Essential Preparation Steps
The first road to baking success is all about mise en place . this french term just means "everything in its place.
" gather all your ingredients for the chocolate almond rolls with vanilla glaze ahead of time. it saves you from scrambling around while your dough is rising – you won't want to burn the house down, right?
Time management is crucial too. set timers on your phone, especially for that tricky second rise . you want to be patient but not end up with dough that's too puffy! and don’t forget to be organized .
Keep your workspace tidy; it’ll make you feel like a pro when you get your bake on.
Now, let’s talk safety considerations . make sure your workspace is free of clutter and think about where you’re placing your hot pans.
You don’t want a surprise trip to the er while you’re trying to enjoy your sweet brunch ideas !
Step-by-Step Process
Alright, let’s break this down with our step-by-step method.
- Prepare the Dough : Start by dissolving 1 packet (2 ¼ tsp) of active dry yeast in 1 cup (240ml) of warm milk (110° F/ 43° C ). Let it sit until frothy, about 5 minutes .
- Knead It : Combine the flour, sugar, and salt, then add the melted butter and egg. Mix until a dough forms. You’ll want to knead that dough for 5- 7 minutes until it's smooth.
- The Rise : Place the dough in a greased bowl and cover it. Let it rise until doubled, which should take about 1 hour .
- Fill ‘Er Up : Mix your filling of chocolate chips, almond meal, brown sugar, and almond extract. Once the dough has risen, roll it out about 1/4-inch thick and spread the filling evenly.
- Slice & Second Rise : Roll it tight and slice into 12 pieces . Let these little beauties rise again for 30 minutes while you preheat the oven to 350° F ( 175° C) .
- Bake : The rolls should bake for 25- 30 minutes until golden brown.
- Glaze Time : Whip up your vanilla glaze while the rolls bake. Just whisk together 1 cup of powdered sugar, 2 tablespoons of milk, and 1 teaspoon of vanilla.
Expert Techniques
Here’s where things get fancy. for professional results, keep a keen eye on temperature control . your dough should be at that gorgeous warmth to rise without dying.
A thermometer can be super helpful. and about timing – every minute counts, folks! set your timer.
Make sure you check for doneness too. when those rolls are golden brown — that’s your cue! also, if you notice any dough looks too wet or dry, don’t hesitate to adjust.
Baking is a living thing, you know?
Success Strategies
Now, let’s chat about some common pitfalls to avoid. one major mistake? not letting your dough rise enough! you want those rolls to be airy and soft .
If they come out dense, it might be because you rushed it.
For quality assurance, always taste a piece after cooling slightly to catch any tweaks you might want next time. i love tweaking flavors - maybe less sugar or adding a pinch of salt.
Additional Information…
If you need to plan ahead (because who wouldn’t want to enjoy those lightly sweetened rolls at the crack of dawn?), you can even prepare the dough a day in advance.
Just pop it in the fridge. and if you’re looking for creative roll fillings beyond chocolate and almond, how about some cinnamon sugar or a fruit medley ?
Remember, it's all about having fun while you’re baking! with these step-by-step baking guides , you'll impress family and friends with your newfound skills.
Whether it’s for breakfast or dessert, this method can set you up for success. so go ahead, roll up those sleeves and indulge in these wonderful flavors! happy baking!
Cooking Secrets and Storage Tips for the Perfect Chocolate Almond Rolls
Alright, my friends, if you're about to embark on the glorious journey of baking chocolate almond rolls with vanilla glaze , prepare to have your taste buds tango! this recipe brings together the nutty crunch of almonds and the rich sweetness of chocolate, all wrapped up in a tender dough.
Let's dive into some insider secrets, storage ideas, and creative variations that'll make your rolls even more delicious!
Pro Tips & Secrets
Chef's personal insights: first off, get ready to roll! did you know that giving your dough some love is key? when you're kneading, treat it gently—this creates that wonderful soft dough that makes these rolls a delight.
Trust me, it’s the secret to keeping your rolls light and fluffy.
Time-saving techniques: chilling your dough for about 30 minutes after mixing will really boost its texture. this little step can save you some hassle and help with rolling it out.
Plus, who doesn’t love a chilled dough situation, am i right?
Flavor enhancement tips: to take this sweet roll recipe up a notch, try adding a splash of almond extract to the glaze.
Oh my gosh, the nutty aroma will just fill your kitchen like a cozy hug.
Presentation advice: when serving these beauties, pile them high on a colorful platter. a little dusting of powdered sugar on top right before serving can add a wow factor that even the fanciest european pastry couldn’t compete with.
Perfect Presentation
Plating techniques: don’t just throw them on a plate! give your rolls some space to breathe. placing them in a circle can create a delightful display that’s perfect for your next brunch gathering.
Garnish ideas: fresh berries or slivers of almonds make lovely garnishes. sprinkle some on the side—this not only adds a pop of color but also a crunchy texture to those rich, lightly sweetened rolls.
Color Combinations: Think about using a dark plate for contrast. Those golden-brown rolls topped with white glaze will look stunning!
Visual Appeal Tips: Drizzle that vanilla glaze in a casual manner instead of fully covering each roll—it’ll give a rustic charm that’s so trendy right now.
Storage & Make-Ahead
Storage guidelines: these rolls can last for about 2 days at room temp if stored in an airtight container. after that, i’d recommend popping them in the fridge.
Just wrap them up snugly!
Preservation Methods: If you want to keep them longer, consider freezing them. Just let them cool completely, then place them in a freezer-safe bag—good for up to 3 months.
Reheating instructions: when you’re ready to indulge again, pop them in the oven at 350° f ( 175° c) for about 10 minutes to reheat.
It’ll feel like you just baked them fresh!
Freshness duration: honestly, they taste best the day they’re made. but trust me, the flavors in a cold roll are still fantastic.
You can always whip up that vanilla glaze recipe again to bring them back to life.
Creative Variations
Flavor Adaptations: Change it up! What about swapping semi-sweet chocolate for dark chocolate? Get daring with some orange zest in the filling for a refreshing twist.
Dietary Modifications: Got friends who are gluten-free? Use a gluten-free baking blend, and they can join in the fun! For a dairy-free recipe swap, coconut milk and oil work wonders.
Seasonal Twists: When fall rolls around, add some pumpkin spice! It’ll make these sweet rolls even cozier. Or, during the summer, maybe pair them with a light lemon glaze instead?
Regional Variations: Feel like exploring? Add some maple flavor for a Northern twist or maybe sprinkle in some cinnamon for that classic Southern comfort food treat vibe.
Complete Nutrition Guide
Before you dig in, let’s chat about what you’re munching on. Here’s the breakdown:
- Calories: Around 220 per roll
- Protein: 4 grams
- Fat: 8 grams
- Carbohydrates: 35 grams
- Sugar: 12 grams
- Fiber: 1 gram
- Sodium: 150 mg
With that being said, these rolls are a tasty balance between indulgent and satisfying—perfect for a breakfast or snack that leaves you feeling cozy.
Encouraging Conclusion
So there you have it—your ultimate guide to mastering those chocolate almond rolls with vanilla glaze . whether you’re whipping them up for yourself as a comforting breakfast food or serving them at a gathering, they’re bound to impress.
Don’t shy away from trying variations or making them your own; after all, cooking is all about experimenting and having fun.
You got this! now, let’s bake up some memories!
Frequently Asked Questions
How do I Bake Chocolate Almond Rolls with Vanilla Glaze without using yeast?
If you're looking to make Chocolate Almond Rolls without yeast, consider using baking powder as an alternative. You can create a quick biscuit-style dough which won’t require rising time. However, the texture will be different, resulting in denser rolls rather than the fluffy pastry you would get with the yeast version.
Can I make these Chocolate Almond Rolls in advance?
Yes! You can prepare the rolls up to the point of baking, then store them in the refrigerator for up to 24 hours before baking. For longer storage, freeze the unbaked rolls in an airtight container for up to 3 months. Simply let them thaw in the fridge overnight, then let them rise as directed before baking.
What are some variations I can try with these Chocolate Almond Rolls?
You can easily customize these rolls! Substitute chocolate chips with dried fruits like cranberries or raisins for a fruity flavor, or use hazelnut spread instead of chocolate for a nutty twist. Additionally, you can experiment with different extracts such as vanilla or coconut in the filling to create unique flavor profiles.
How should I store leftover Chocolate Almond Rolls?
Store any leftover Chocolate Almond Rolls in an airtight container at room temperature for up to 2 days. For longer preservation, you can refrigerate them for up to a week or freeze the rolls wrapped tightly in plastic wrap for up to 3 months. Reheat gently in the oven or microwave before serving.
What nutritional considerations should I keep in mind with these rolls?
Each roll contains about 220 calories, with 4g of protein and 8g of fat. They are relatively high in carbohydrates and sugar, so if you're watching your intake, consider enjoying them in moderation or experimenting with healthier substitutes like whole grain flour or a sugar alternative.
What tips can you share for making the perfect Bake Chocolate Almond Rolls with Vanilla Glaze?
For the best results, ensure that your milk is warm but not hot, as high temperatures can kill the yeast necessary for rising. Knead the dough until it's smooth, and allow for sufficient rising time. Additionally, drizzle the glaze on the rolls while they’re still warm for better adherence and flavor absorption!
Decadent Chocolate Almond Rolls with Luxurious Vanilla Glaze Card
⚖️ Ingredients:
- 3 ½ cups (440g) all-purpose flour
- 1/4 cup (50g) granulated sugar
- 1 packet (2 ¼ tsp or 7g) active dry yeast
- 1 cup (240ml) warm milk (110°F/43°C)
- 1/4 cup (60g) unsalted butter, melted
- 1 large egg
- 1/2 teaspoon salt
- 1/2 cup (120g) semi-sweet chocolate chips
- 1/2 cup (50g) almond meal (finely ground almonds)
- 1/4 cup (50g) brown sugar
- 1 teaspoon almond extract
- 1 cup (120g) powdered sugar
- 2 tablespoons (30ml) milk
- 1 teaspoon vanilla extract
🥄 Instructions:
- Step 1: In a bowl, dissolve yeast in warm milk and let it stand until frothy (about 5 minutes).
- Step 2: In a separate bowl, combine flour, sugar, and salt.
- Step 3: Add melted butter and egg to the yeast mixture, then combine with dry ingredients until a dough forms.
- Step 4: Knead the dough on a floured surface for 5-7 minutes until smooth.
- Step 5: Place in a greased bowl, cover with a kitchen towel, and let it rise until doubled (about 1 hour).
- Step 6: In a bowl, combine chocolate chips, almond meal, brown sugar, and almond extract. Set aside.
- Step 7: Once risen, punch down the dough and roll it out on a floured surface into a rectangle (about 1/4-inch thick).
- Step 8: Spread the filling evenly over the dough, leaving a small border.
- Step 9: Roll the dough tightly from one end to the other and slice into 12 even pieces.
- Step 10: Place rolls on a baking sheet lined with parchment paper. Cover with a towel and let rise for an additional 30 minutes.
- Step 11: Preheat the oven to 350°F (175°C). Bake for 25-30 minutes until golden brown.
- Step 12: While rolls bake, whisk together powdered sugar, milk, and vanilla until smooth.
- Step 13: Allow rolls to cool slightly before drizzling with the vanilla glaze.
Previous Recipe: My Go-To Fluffy Pancakes: Easy & Delicious Recipe for Joyful Mornings
Next Recipe: Pan-Fried Beef Salisbury Steak with Gravy