3 Ingredient Peanut Butter Fudge
Have you tried my 3 ingredient peanut butter fudge? It's a creamy dream that takes just moments to whip up. Perfect for gatherings! Give it a go today!

The Sweet Simplicity of 3 Ingredient Peanut Butter Fudge
Have you ever had a moment when you crave something sweet but don’t want to spend hours in the kitchen? i totally get it! a few winters ago, i was snowed in with my kids, and we decided to whip up something deliciously simple.
That was the day we discovered the 3 ingredient peanut butter fudge . oh my gosh, it was like magic! just three ingredients brought us a classic american dessert that was rich, creamy, and oh-so-satisfying.
Have you ever tasted something that makes all your worries fade away? this fudge is that kind of treat.
A Tasty Tradition
Historically, peanut butter fudge is a beloved treat that has been around in various forms for generations. it warms the hearts (and tummies) of families across america.
With its origins deeply rooted in peanut butter’s rise in the early 1900s, it’s a testament to how a few humble ingredients—peanut butter, butter, and sugar—can create something extraordinary.
Nowadays, you can’t scroll through social media without bumping into someone showing off their take on this easy fudge recipe .
What's cool is that this recipe is perfect for anyone. whether you’re a newbie or a baking pro, you can whip this up in about 45 minutes .
Honestly, that’s quick! and the best part? it’s a no-bake fudge , so you don’t even have to crank up the oven.
This means more time enjoying your quick peanut butter treats and less time sweating in the kitchen.
Why You’ll Love This Fudge
Now let's talk benefits. first off, this fudge is a hit at gatherings . birthday party treat? you bet! family get-together? absolutely! it’s easy to make, and you'll probably have everyone asking for the recipe.
And the health highlights are pretty sweet too. made with just three simple ingredients, it’s a manageable treat for your sugar cravings without being overly indulgent.
Each delightful piece gives you that satisfying sweetness while still being somewhat controlled on the calorie count.
And if you’re concerned about dietary needs, fear not! this homemade fudge can easily be adapted. if you need a dairy-free fudge alternative , just swap in coconut oil for the butter.
Add chocolate chips for that rich chocolate peanut butter fudge twist, or even some chopped nuts for a little crunch.
Options, options!
Perfect Timing for Any Occasion
You don’t need a special occasion to enjoy this peanut butter goodness. but if you want to impress your friends as they pop over for movie night, this is where you want to be! so simple and kid-friendly , it’s a great choice for teaching the little ones about baking without the fuss.
Plus, it’s a visual treat—who can resist a smooth peanut butter candy waiting in the fridge?
Once made, storing your fudge is a breeze! pop it in an airtight container and let it hang out in the fridge.
Trust me, it can last for about a week, though i doubt it’ll survive that long once you start sharing it!
Now that you're ready to dive into this peanut butter dessert — why don’t we talk about what you actually need?
So, if you're up for some deliciousness, grab these ingredients, and let’s make some creamy fudge magic! it's time to pull out that mixing bowl and spatula.
Get ready to treat your sweet tooth as we jump into the yummy goodness of decadent 3 ingredient peanut butter fudge !
Your Ultimate Guide to Essential Ingredients
When you dive into the world of cooking, knowing your essential ingredients can make all the difference. seriously, it’s like having a secret weapon in your cooking arsenal.
Let’s break it down so you can whip up delicious meals like a pro—even if you’re just starting out!
Premium Core Components
First things first, let’s talk about those premium core components . these are the building blocks of any great dish. for example, when it comes to peanut butter desserts , quality peanut butter is key.
-
Measurements matter : if you’re all about precision, this is your jam! for us americans, you'll need 1 cup (240g) of creamy peanut butter.
If you’re in europe, that’s a handy 240 grams . easy peasy!
-
Quality indicators : Look for the real stuff . Avoid anything with long, weird ingredients. Think simplicity like “peanuts and salt.”
-
Store it right : Keep your peanut butter in the pantry, but once you open it, you might want to refrigerate it to keep it fresh.
-
Freshness tips : Pay attention to the smell and texture . If it looks off or smells funky, toss it!
Signature Seasoning Blend
Now, let’s spice things up! A good signature seasoning blend can take your dishes from drab to fab in no time flat.
-
Think essential spices like garlic powder, paprika, and black pepper. These will get you started.
-
Pair herbs with your ingredients. For instance, basil and tomatoes are a match made in heaven.
-
Don’t forget those flavor enhancers ! Sea salt and fresh lemon juice can elevate a dish in seconds.
-
Wanna get fancy? Explore regional variations . Try Cajun seasoning for a kick or cumin for a warm depth.
Smart Substitutions
It happens to the best of us. You get ready to whip something up, but you’re missing an ingredient. No stress—let’s talk about some smart substitutions !
-
Common alternatives : No sour cream? Greek yogurt is a great swap.
-
Dietary modifications : If you’re keeping it plant-based, try nut milk instead of regular cow’s milk.
-
Stuck in a pinch? Try three-ingredient desserts like our upcoming 3 ingredient peanut butter fudge . It’s a lifesaver!
-
Seasonal options are always a plus. For example, if pumpkin purée is in season, throw it in your baked goods instead of applesauce.
Kitchen Equipment Essentials
Let’s move on to those kitchen equipment essentials that you shouldn’t live without.
-
Start with the must-have tools like a sturdy mixing bowl, measuring cups, and a rubber spatula. These ain't just for show—they’ll become your best buddies in the kitchen!
-
If you’re not about spending big bucks, look for alternative equipment options . No stand mixer? A hand mixer works just as well.
-
Preparation tips? Always read your recipe thoroughly first. Trust me, nothing’s worse than starting a recipe only to find out you’re missing equipment.
-
And when you’re done, make sure to store your tools properly to keep your kitchen organized. It’ll save you time searching when you’re trying to whip up a quick snack or a homemade fudge!
So, you’re ready to dive into the deliciousness of peanut butter desserts? Up next, let’s get into the scrumptious details of making that 3 ingredient peanut butter fudge that has everyone craving sweets!
This no-bake fudge is perfect for gatherings, birthday parties, or just satisfying a sweet tooth. With just a few ingredients and a little chill time, you’ll be on your way to creating simple sweets that everyone will adore!
Professional Cooking Method
So, you wanna whip up some magic in the kitchen? let’s dive into the professional cooking methods that’ll have you feeling like a superstar chef in no time.
Today, we’ll sprinkle in a little something sweet — like making 3 ingredient peanut butter fudge — while also focusing on essential prep steps, step-by-step processes, expert techniques, and success strategies.
Ready? let’s go!
Essential Preparation Steps
Mise en place is your best bud. it’s french for “everything in its place.” gather your ingredients before you start cooking.
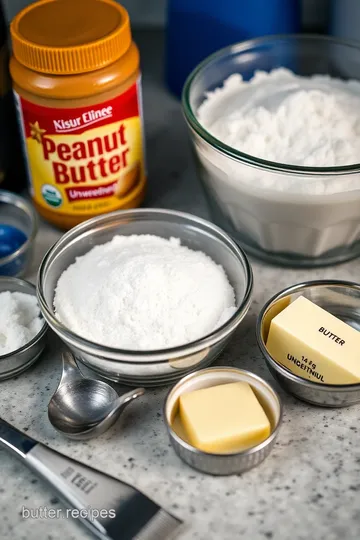
For our fudge, you'll need 1 cup of creamy peanut butter , 1 cup of powdered sugar , and 1/4 cup of melted unsalted butter .
Pretty simple, huh?
Now, time management is key! set a timer for about 15 minutes prep and 30 minutes chilling time, and trust me—having everything ready before you start means less mess and more fun.
Staying organized can turn a chaotic kitchen into a smooth-operating cooking station. keep your work area clean and your tools close.
Safety is vital too; remember to watch out for hot surfaces and sharp knives. kitchen injuries are no joke!
Step-by-Step Process
Here’s how we bring this peanut butter dream to life!
-
Prepare your baking dish : Line an 8x8-inch dish with parchment paper. This little trick will help you out later.
-
Mix up your base : In a mixing bowl, combine the creamy peanut butter and the melted butter . Those two need some lovin’ together—mix it until smooth!
-
Add sugar : Gradually introduce the powdered sugar . Stir it up until you get a thick, heavenly dough. This will take a bit of elbow grease.
-
Spread and chill : Pour your mixture into that lined dish and spread it out evenly.
-
Chill time : Pop it in the fridge for at least 30 minutes , until it gets firm.
-
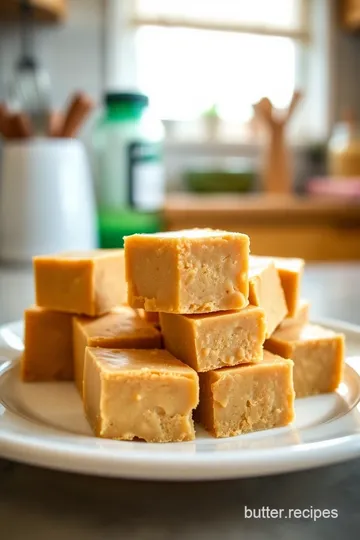
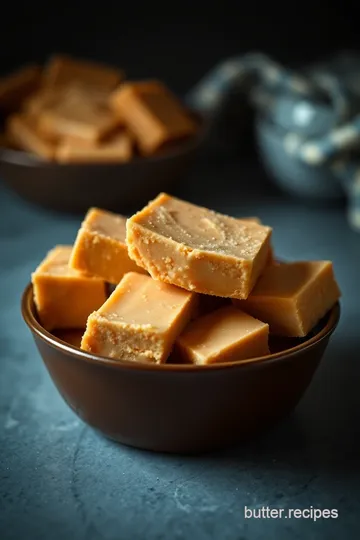
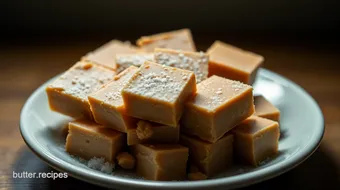
Cut and serve : Once it’s set, slice it into squares and enjoy!
Expert Techniques
Let’s talk about making this fudge reach its peak! For a creamier fudge, blend that peanut butter and butter together before adding sugar. Trust me, it's a game-changer.
As a quality checkpoint, check for no lumps in your batter. Nobody likes a chunky fudge unless you’re adding nuts!
Troubleshooting tip: if your fudge is too soft, give it some extra chilling time. if it’s too hard, next time try reducing the chilling time a bit or add just a tad more butter.
Success Strategies
Alright, here are some common mistakes to dodge. don’t skip pre-measuring your ingredients; accuracy is a winning game in the kitchen.
Also, avoid overmixing once you add the sugar. we want it thick and fudgy, not gummy!
Quality assurance tip: taste a small piece of the mixture before chilling. Adjust sweetness if needed—your taste buds will thank you later!
Want to be ahead of the game? make this fudge a day or two in advance. it's a fantastic no-bake fudge recipe that gets even better with a little time.
And trust me, it’s a big hit at birthday parties or during family gatherings.
Additional Information
By now, you've mastered this easy fudge recipe ! can you believe how simple it is? just a few ingredients and a bit of chill time yield a delightful treat.
Let’s chat about variations next—maybe adding some chocolate chips or trying out different nut butters. after all, peanut butter desserts are meant to be playful and fun!
In case you’re wondering, this 3 ingredient peanut butter fudge can also be made gluten-free and dairy-free, just swap in coconut oil instead of butter, and bam—everyone's happy! So, when you’re knee-deep in fudge-making and feeling fabulous, remember, cooking is all about having fun and creating something tasty!
Now that you have the basics down, feel free to make this recipe your own! Can't wait to hear how your fudge turns out. Happy cooking, friend!
Unlocking the Secrets of 3 Ingredient Peanut Butter Fudge
Okay, let’s dive into the world of 3 ingredient peanut butter fudge – trust me, if you're looking for an easy fudge recipe that packs a punch, you've hit the jackpot.
This little delight is not just any peanut butter dessert ; it’s a classic, creamy masterpiece that screams comfort with every bite.
Perfect for those spontaneous sweet tooth cravings or even for those family gatherings where you wanna wow the crowd without spending all day in the kitchen.
Pro Tips & Secrets
So, let’s spill some of my personal insights. first off , make sure your peanut butter is at room temperature.
Seriously, it makes mixing a total breeze. and don’t even get me started on adding a pinch of salt . this little tweak can elevate the flavor to next-level deliciousness, making this treat a perfect combo of sweet and salty.
Time-saving techniques? oh, you bet! prepping your baking dish with parchment paper can save you a lot of hassle later on when you’re trying to get that fudge out.
Trust me, it’s worth the extra step.
For those of you looking to enhance flavors , consider adding a splash of vanilla extract or even some melted chocolate swirled in before chilling. The more flavor, the better, you know?
Perfect Presentation
When it comes to plating , presentation isn’t just for fancy restaurants. take a sturdy platter and arrange your fudge squares neatly—these little bites of joy deserve to look good! you could even sprinkle some crushed nuts or colorful sprinkles on top.
Garnish ideas? Use fresh fruit like strawberries or banana slices around your fudge. The contrast of colors will not only make your fudge look elegant but also add a fresh kick.
And let’s chat about those visual appeal tips. pour your fudge into a pan lined with pretty parchment paper before spreading it out.
Not only does it make the removal easier, but it also looks super cute when you slice it into squares.
Storage & Make-Ahead
Now, you might wonder, “how do i keep this goodness fresh?” here's what i do— store your fudge in an airtight container .
It should last in the fridge for up to a week. but trust me, you’ll probably finish it long before that!
If you wanna make it ahead of time, you totally can. just keep it chilled until you’re ready to serve.
For those hot summer months, let’s be honest: chilled desserts make everything better!
Creative Variations
Feeling adventurous? you can easily switch things up with this easy fudge recipe . want a chocolate twist? just melt some chocolate and swirl it in with the peanut butter.
Bam! you’ve got chocolate peanut butter fudge .
How about a seasonal twist ? add crushed candy canes during the holidays, or mix in pumpkin spice for a fall sensation.
Trust me, these variations are perfect for those sweet treats for kids or anyone who loves a good dairy-free fudge alternative .
Complete Nutrition Guide
Now, let’s break it down a bit for those who are health-conscious. each piece of this fudge gives you about 100 calories per serving.
With a fair amount of protein and healthy fats from the peanut butter, you're getting more than just sugar. plus, it’s naturally gluten-free!
Expert FAQ Solutions
Got questions? i’ve got your back. one common issue folks face is the fudge turning out too soft. just make sure to let it chill long enough—at least 30 minutes is key! and if you want a firmer texture, pop it in the freezer for a bit.
In case you ever feel like tweaking your fudge, here’s a tip: keep the ratios the same. it’s about balancing your fudge with few ingredients .
Less is truly more with these simple sweets.
Wrapping It Up
So there you have it! this 3 ingredient peanut butter fudge is not just an easy yet irresistible treat; it’s a fun recipe that you can get creative with.
Whether you're whipping it up for a casual movie night or fancying it up for a birthday party, it’s bound to bring smiles all around.
Don’t overthink it! Get into the kitchen, have some fun, and whip up this no-bake fudge today. Your sweet tooth will thank you, and so will your friends and family. Happy fudge-making!
3 Ingredient Peanut Butter Fudge Card
⚖️ Ingredients:
- 1 cup (240g) creamy peanut butter (unsweetened)
- 1 cup (120g) powdered sugar
- 1/4 cup (60ml) unsalted butter, melted
🥄 Instructions:
- Step 1: Line the 8x8-inch baking dish with parchment paper for easy removal, if desired.
- Step 2: In a mixing bowl, combine the creamy peanut butter and melted butter. Use a rubber spatula to mix until smooth and well combined.
- Step 3: Gradually add the powdered sugar to the peanut butter mixture. Stir until fully incorporated and a thick, doughy consistency forms.
- Step 4: Transfer the fudge mixture into the prepared baking dish. Use the spatula to smooth the top evenly.
- Step 5: Refrigerate for at least 30 minutes or until firm.
- Step 6: Once set, remove from the dish and cut into squares. Serve chilled or at room temperature.
Previous Recipe: How to Make Blue Bonnet Butter: A Creamy Delight for Every Meal
Next Recipe: How to Enjoy Decadent Homemade Reese's Peanut Butter Cups: 5 Tasty Tips!